
Google just released the first version of the next major Android update. Early Android 11 builds will only available as developer previews, so you can't just sign up for the beta program and install the update as an OTA for the first couple months. That said, it's still pretty easy to get.
You'll need an unlocked bootloader to install the DP1 build of Android 11, also known as Android R. If you haven't already done that, it will factory reset your phone. But if your bootloader's already unlocked, there's a way to flash Android 11 without losing any data, and that's what I'll outline below.
Step 1: Unlock Your Bootloader
Your bootloader needs to be unlocked before you can flash firmware images. If you haven't already done this, you can get help from one of our guides below. But note that Pixels bought from certain carriers may not have unlockable bootloaders.
Step 2: Download the Developer Preview Images
Now, you will need to download the Android 11 developer images corresponding to your Pixel phone. These files are quite large, so be prepared to wait a few minutes on a slower internet connection.
Step 3: Extract the Images
Once the ZIP with the developer preview images is downloaded onto your computer, you will need to extract its contents. You only need to extract the first ZIP file; the other ZIP files that appear in the extracted folder should be left alone. To extract the file, you can use the built-in extractor found in Windows or use a third-party program like 7-Zip.
Step 4: Download the Platform-Tools Package
You now need Google's platform-tools package. These files allow your computer and phone to communicate while in Fastboot mode. Download the latest version of platform-tools using the link below for whatever operating system you are running on your computer.
Step 5: Extract the Platform-Tools Package & Copy Files
Now, extract the platform-tools ZIP. Open the folder created after extracting platform-tools, highlight all its contents, and use ctrl+x to capture everything inside. Then, open the folder with the developer preview images again and paste the platform-tools contents inside.
Step 6: Modify the Flash-All Script
Now before you flash the update, there are a few things you'll want to do beforehand. The first thing is to prevent your phone from erasing all your data during the upgrade. While Google recommends removing all your data since this is a developer preview and it works best on a fresh install, you can always factory reset your device later if you run into any issues.
To protect your data from being erased, you need to edit the following files in the extracted developer preview images folder:
flash-all.bat (Windows)
flash-all.sh (macOS/Linux)
For Windows users, right-click on the "flash-all.bat" file and select "Edit" in the context menu. For macOS and Linux users, double click the file to open the text editor. In the editor, look for the line "fastboot -w" (it is towards the bottom) and delete "-w" and then save the change. Now, when you update to Android 11, you will not lose your data.
For macOS and Linux users, there are two more things you need to do to be able to flash in the first place. The first thing is to delete the following lines:
if ! [ $($(which fastboot) --version | grep "version" | cut -c18-23 | sed 's/\.//g' ) -ge 2802 ]; then
  echo "fastboot too old; please download the latest version at https://developer.android.com/studio/releases/platform-tools.html"
  exit 1
fi
Then, before each line of code that starts with "fastboot," place a "./" before each one, changing it to "./fastboot" and then save the edits you made.
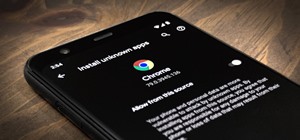
Step 7: Boot into Bootloader Mode
Turn off your Pixel. Once off, hold down the volume down and power buttons until the screen turns on. A screen should appear called "Fastboot mode" — leave your phone on this screen and connect it to your computer with a USB cable.
Step 8: Update to Android 11
If you're on Windows, all you need to do now is double click on the "flash-all.bat" file in the extracted developer preview images folder. This is an executable file, so it automatically opens Command Prompt and begins the upgrading process to Android 11.
For macOS and Linux users, you need to first open Terminal and redirect it to the factory images folder by typing "cd," hitting the space bar, then dragging the factory images folder to Terminal. This will populate Terminal with the full address location of the folder. Hit enter and a new line should appear. On this line, input the following code and hit enter to start the upgrade process:
flash-all.shThe process takes about 10 minutes and your phone will restart a few times. Once either Command Prompt or Terminal states "finished," it should reboot one more time, but this time into Android 11!
Who needs a wand? Unlock your magical powers and transform yourself from a Muggle into a Wizard or Witch just by using your Android phone. See how:


2 Comments
You guys are usually spot on with advice. But you missed that anybody with a locked bootloader can adb sideload the full OTA. developer.android.com/preview/download-ota.html
This one's just for flashing the images but we're working on a guide for flashing the OTA!
Share Your Thoughts