


For modders, there are few tools more important than TWRP. TeamWin's custom recovery makes flashing mods like Magisk, Xposed, and custom ROMs incredibly easy, and it lets you root your phone at the press of a button. On top of that, it can make complete backups of your phone in case you mess up. That's why, for Essential users, this should be the first mod you add.
The process is a bit more complicated on the Essential PH-1 because of seamless updates. The dual partitions make flashing TWRP a bit more complex than it was on previous phones. However, thanks to Essential's friendly policy towards modders, the process isn't too difficult, and with our guide, you'll have this indispensable tool on your phone in no time.
What You'll Need
- Windows, Mac, or Linux computer
- ADB and Fastboot installed
- USB data cable
Unlock Your Bootloader
Before you can flash any custom firmware on your Essential PH-1, you will need to unlock your bootloader. This is as simple as enabling "OEM Unlocking" in Developer Options, then sending two Fastboot commands while your phone is in bootloader mode (fastboot flashing unlock_critical then fastboot flashing unlock). For an in-depth tutorial, check the link below.
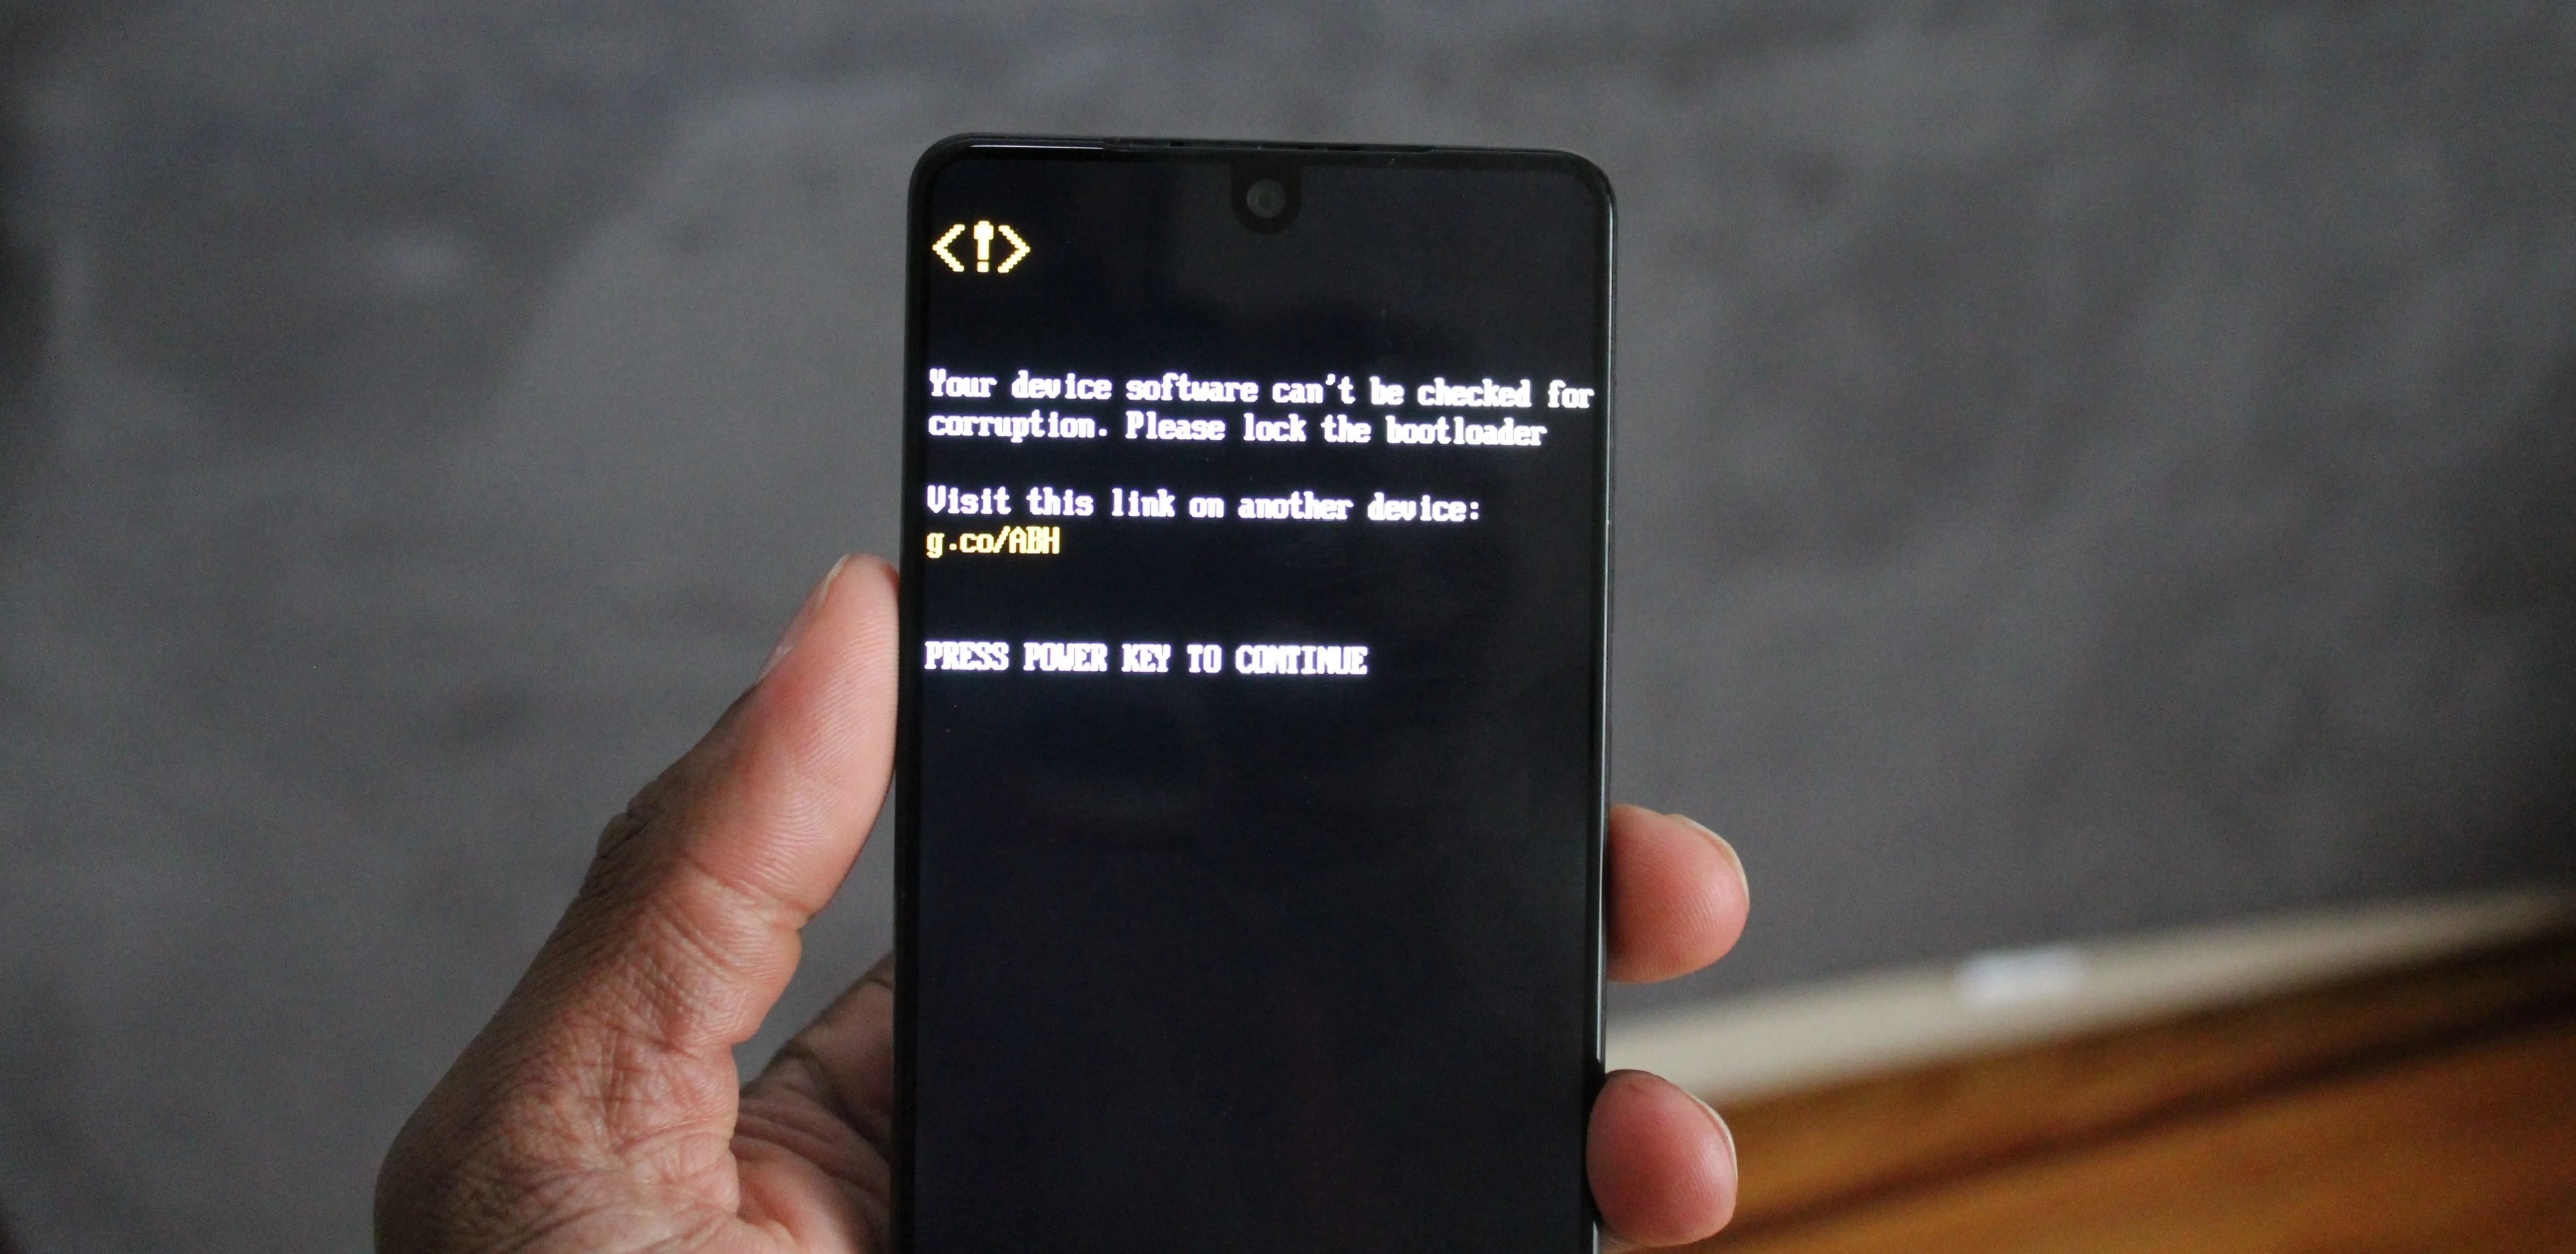
You will see a screen like this when you boot up the phone when your bootloader is unlocked.
Download the TWRP Files
Because Essential PH-1 supports Seamless Updates (A/B partitions), you will need to download two files to install TWRP: a ZIP and an IMG. First, download the ZIP file from your phone using the link below.
Next, you'll need to download the IMG file to your computer. Click the link below from your desktop or laptop to download it.
Next, to simplify things, you'll have to move the IMG file to the platform-tools folder inside of your ADB and Fastboot installation directory. For Windows users who followed Method 1 in our ADB installation guide, this can be found at C:\Program Files (x86)\Android\android-sdk\platform-tools.
If you used another ADB installation method on Windows, or if you're using Linux or Mac, you'll have to find your platform-tools folder by searching your computer's hard drive. Once you've found it, move the TWRP IMG file from your download folder into the platform-tools folder.
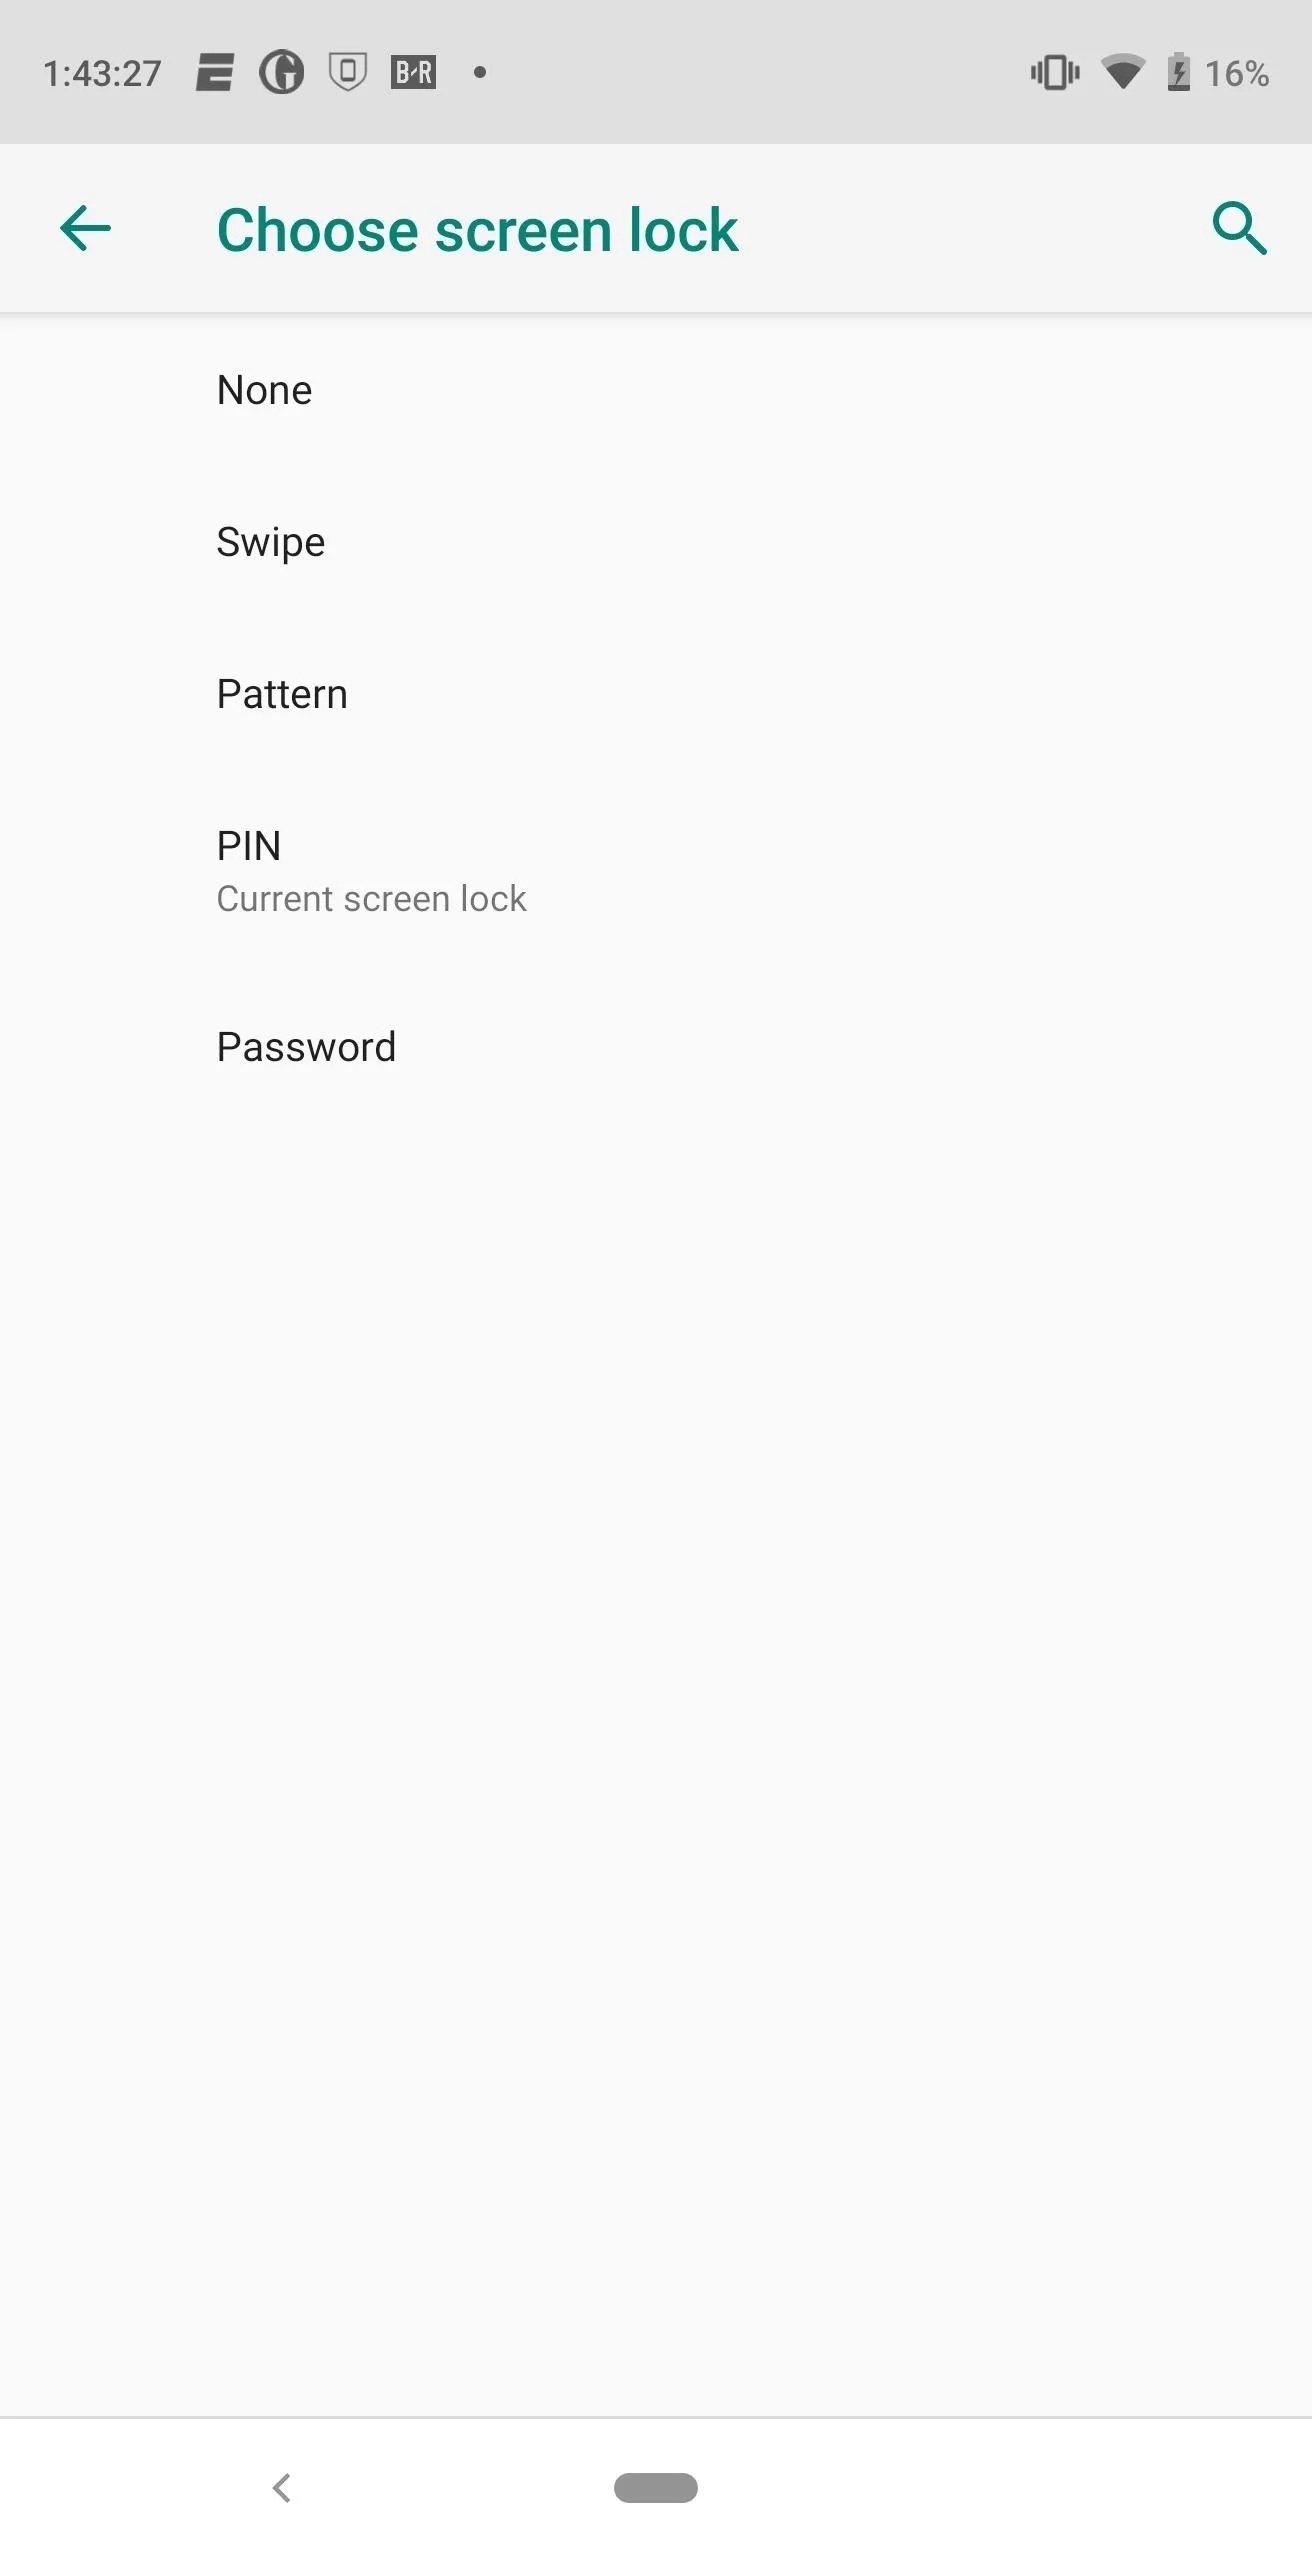
Switch to a PIN or Password
This version of TWRP can decrypt your phone's storage partition, but it will need your passcode to do so. Because gestures are harder to input with the provided keyboard, we suggest sticking with a PIN or password.
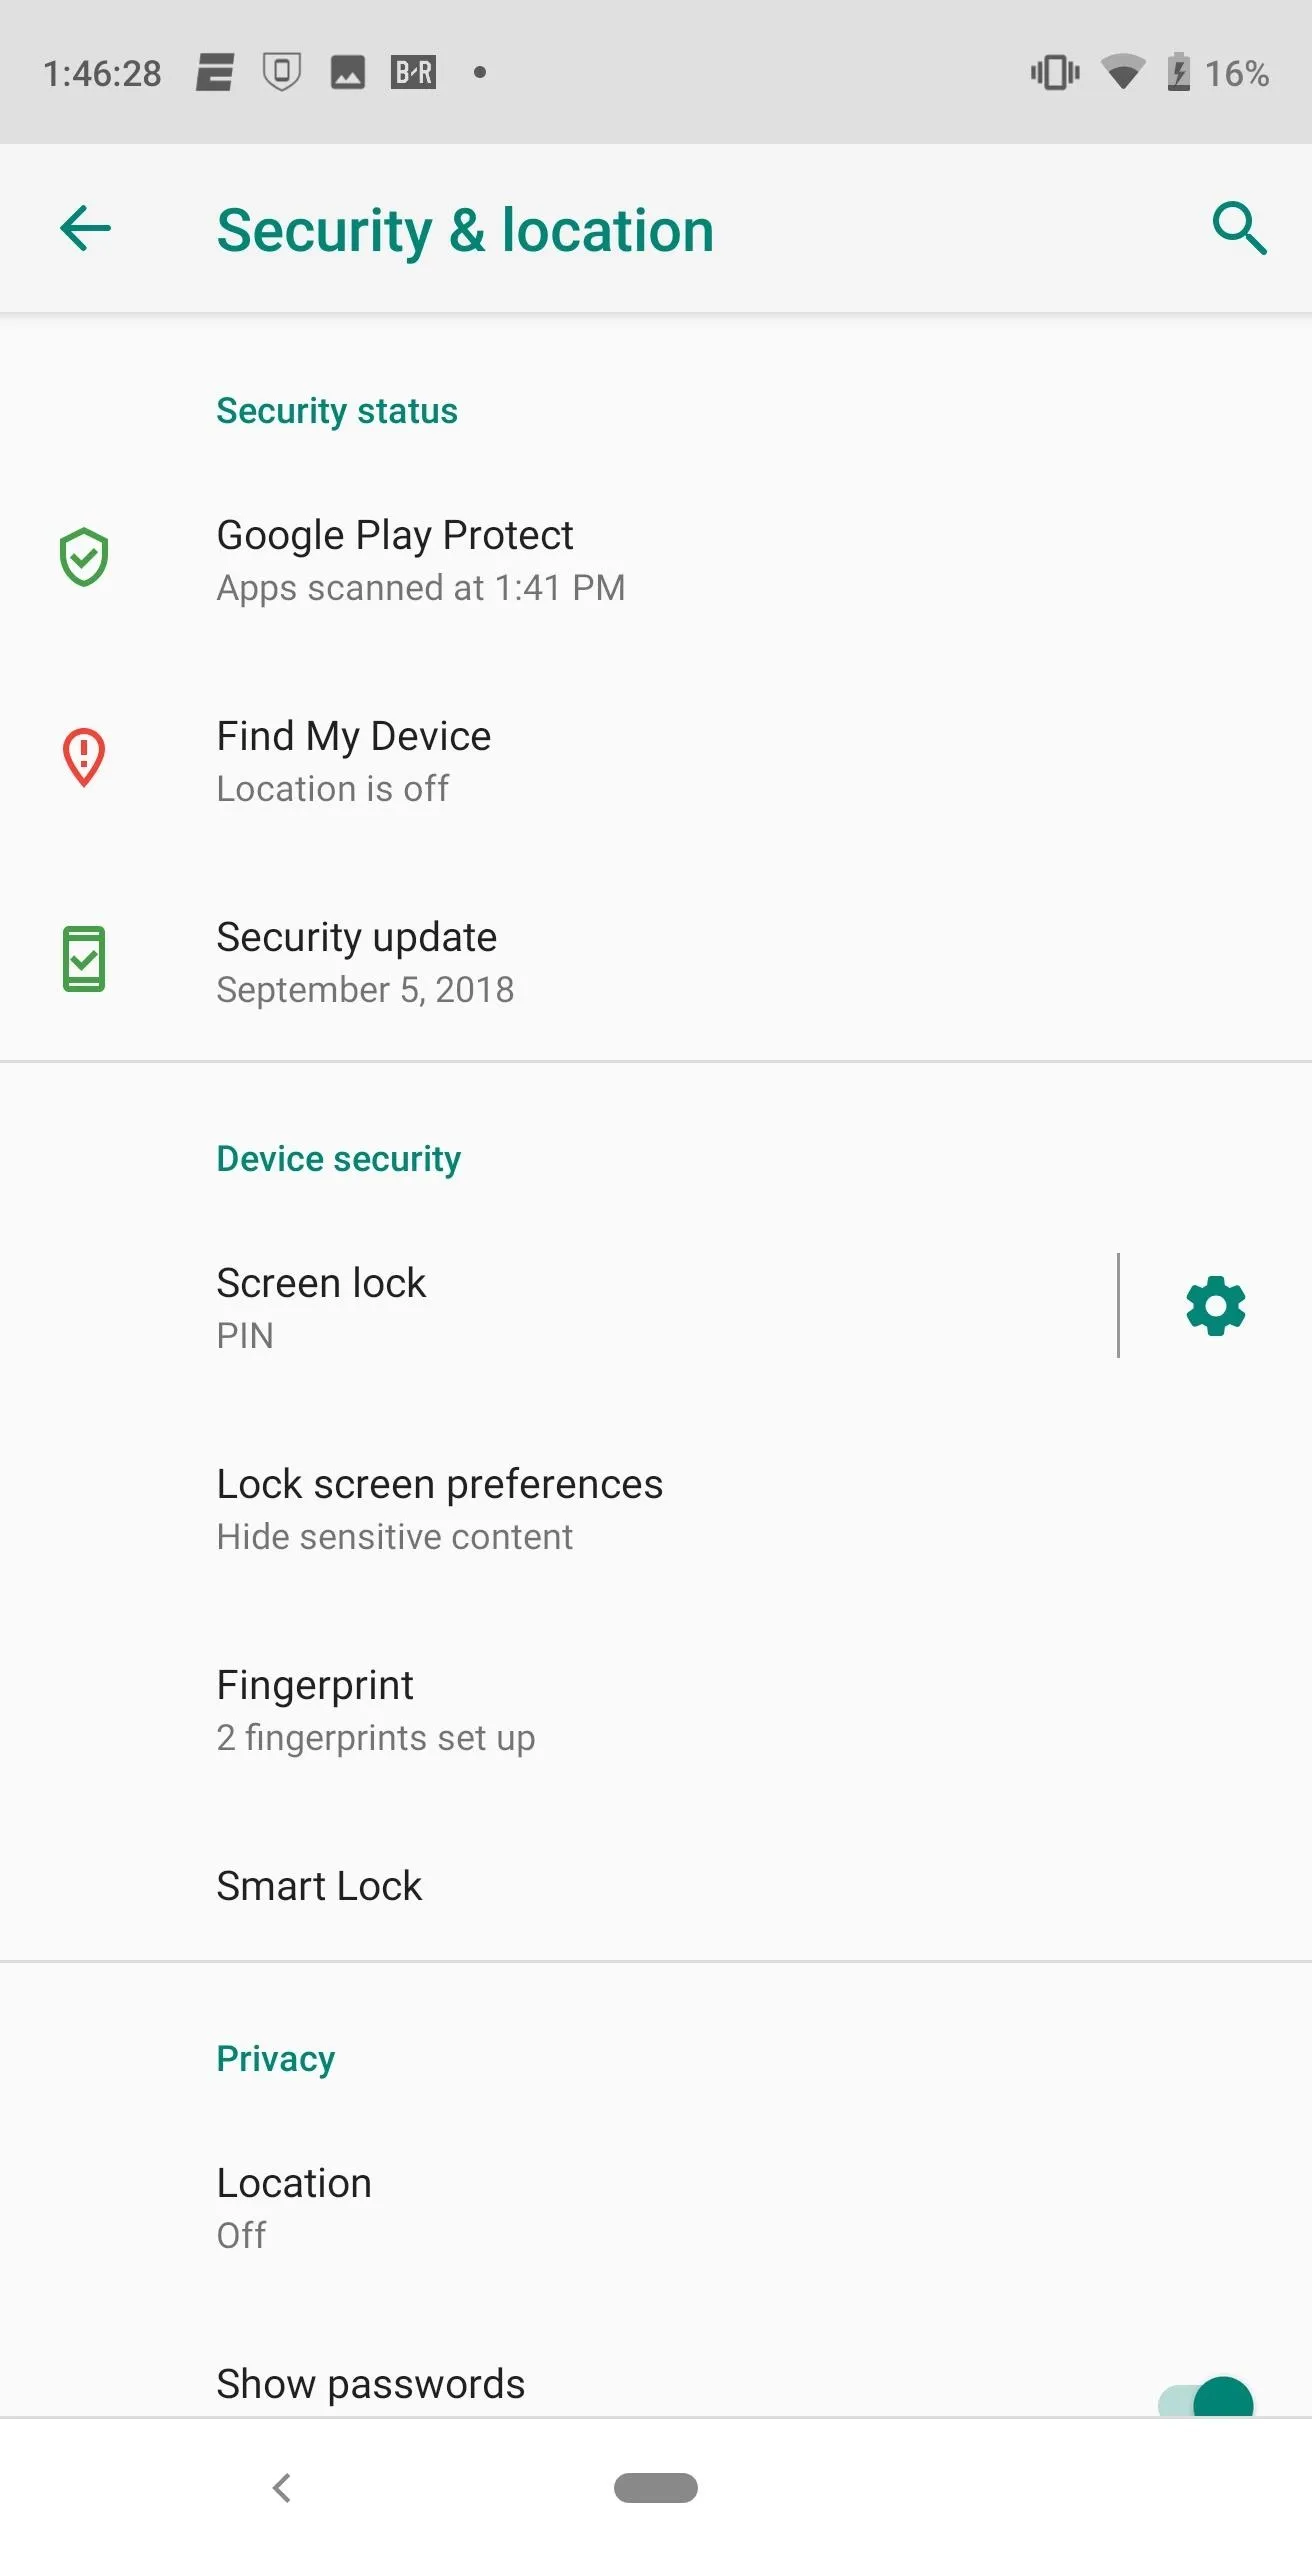
To switch to either a PIN or password, open Settings and choose "Security & location." Select "Screen lock" and, after inputting your current passcode, choose either PIN or password.
Reboot to the Bootloader
Now, connect your phone to your computer with the USB cable. On your computer, open up the command prompt (Windows) or terminal (macOS and Linux). If you're on Windows, you can do this by pressing the Windows button on your keyboard, then typing "cmd" and hitting enter. If you're on Mac or Linux, simply open the "Terminal" app from your Applications folder.
With the command window open, you'll now need to change directories to the platform-tools folder. This can be done by typing "cd
Now, enter the following command into the command prompt or terminal:
adb reboot bootloaderAfter roughly 10 seconds, your phone should boot into bootloader mode. You should see a screen like the one below, which indicates you can now input Fastboot commands.
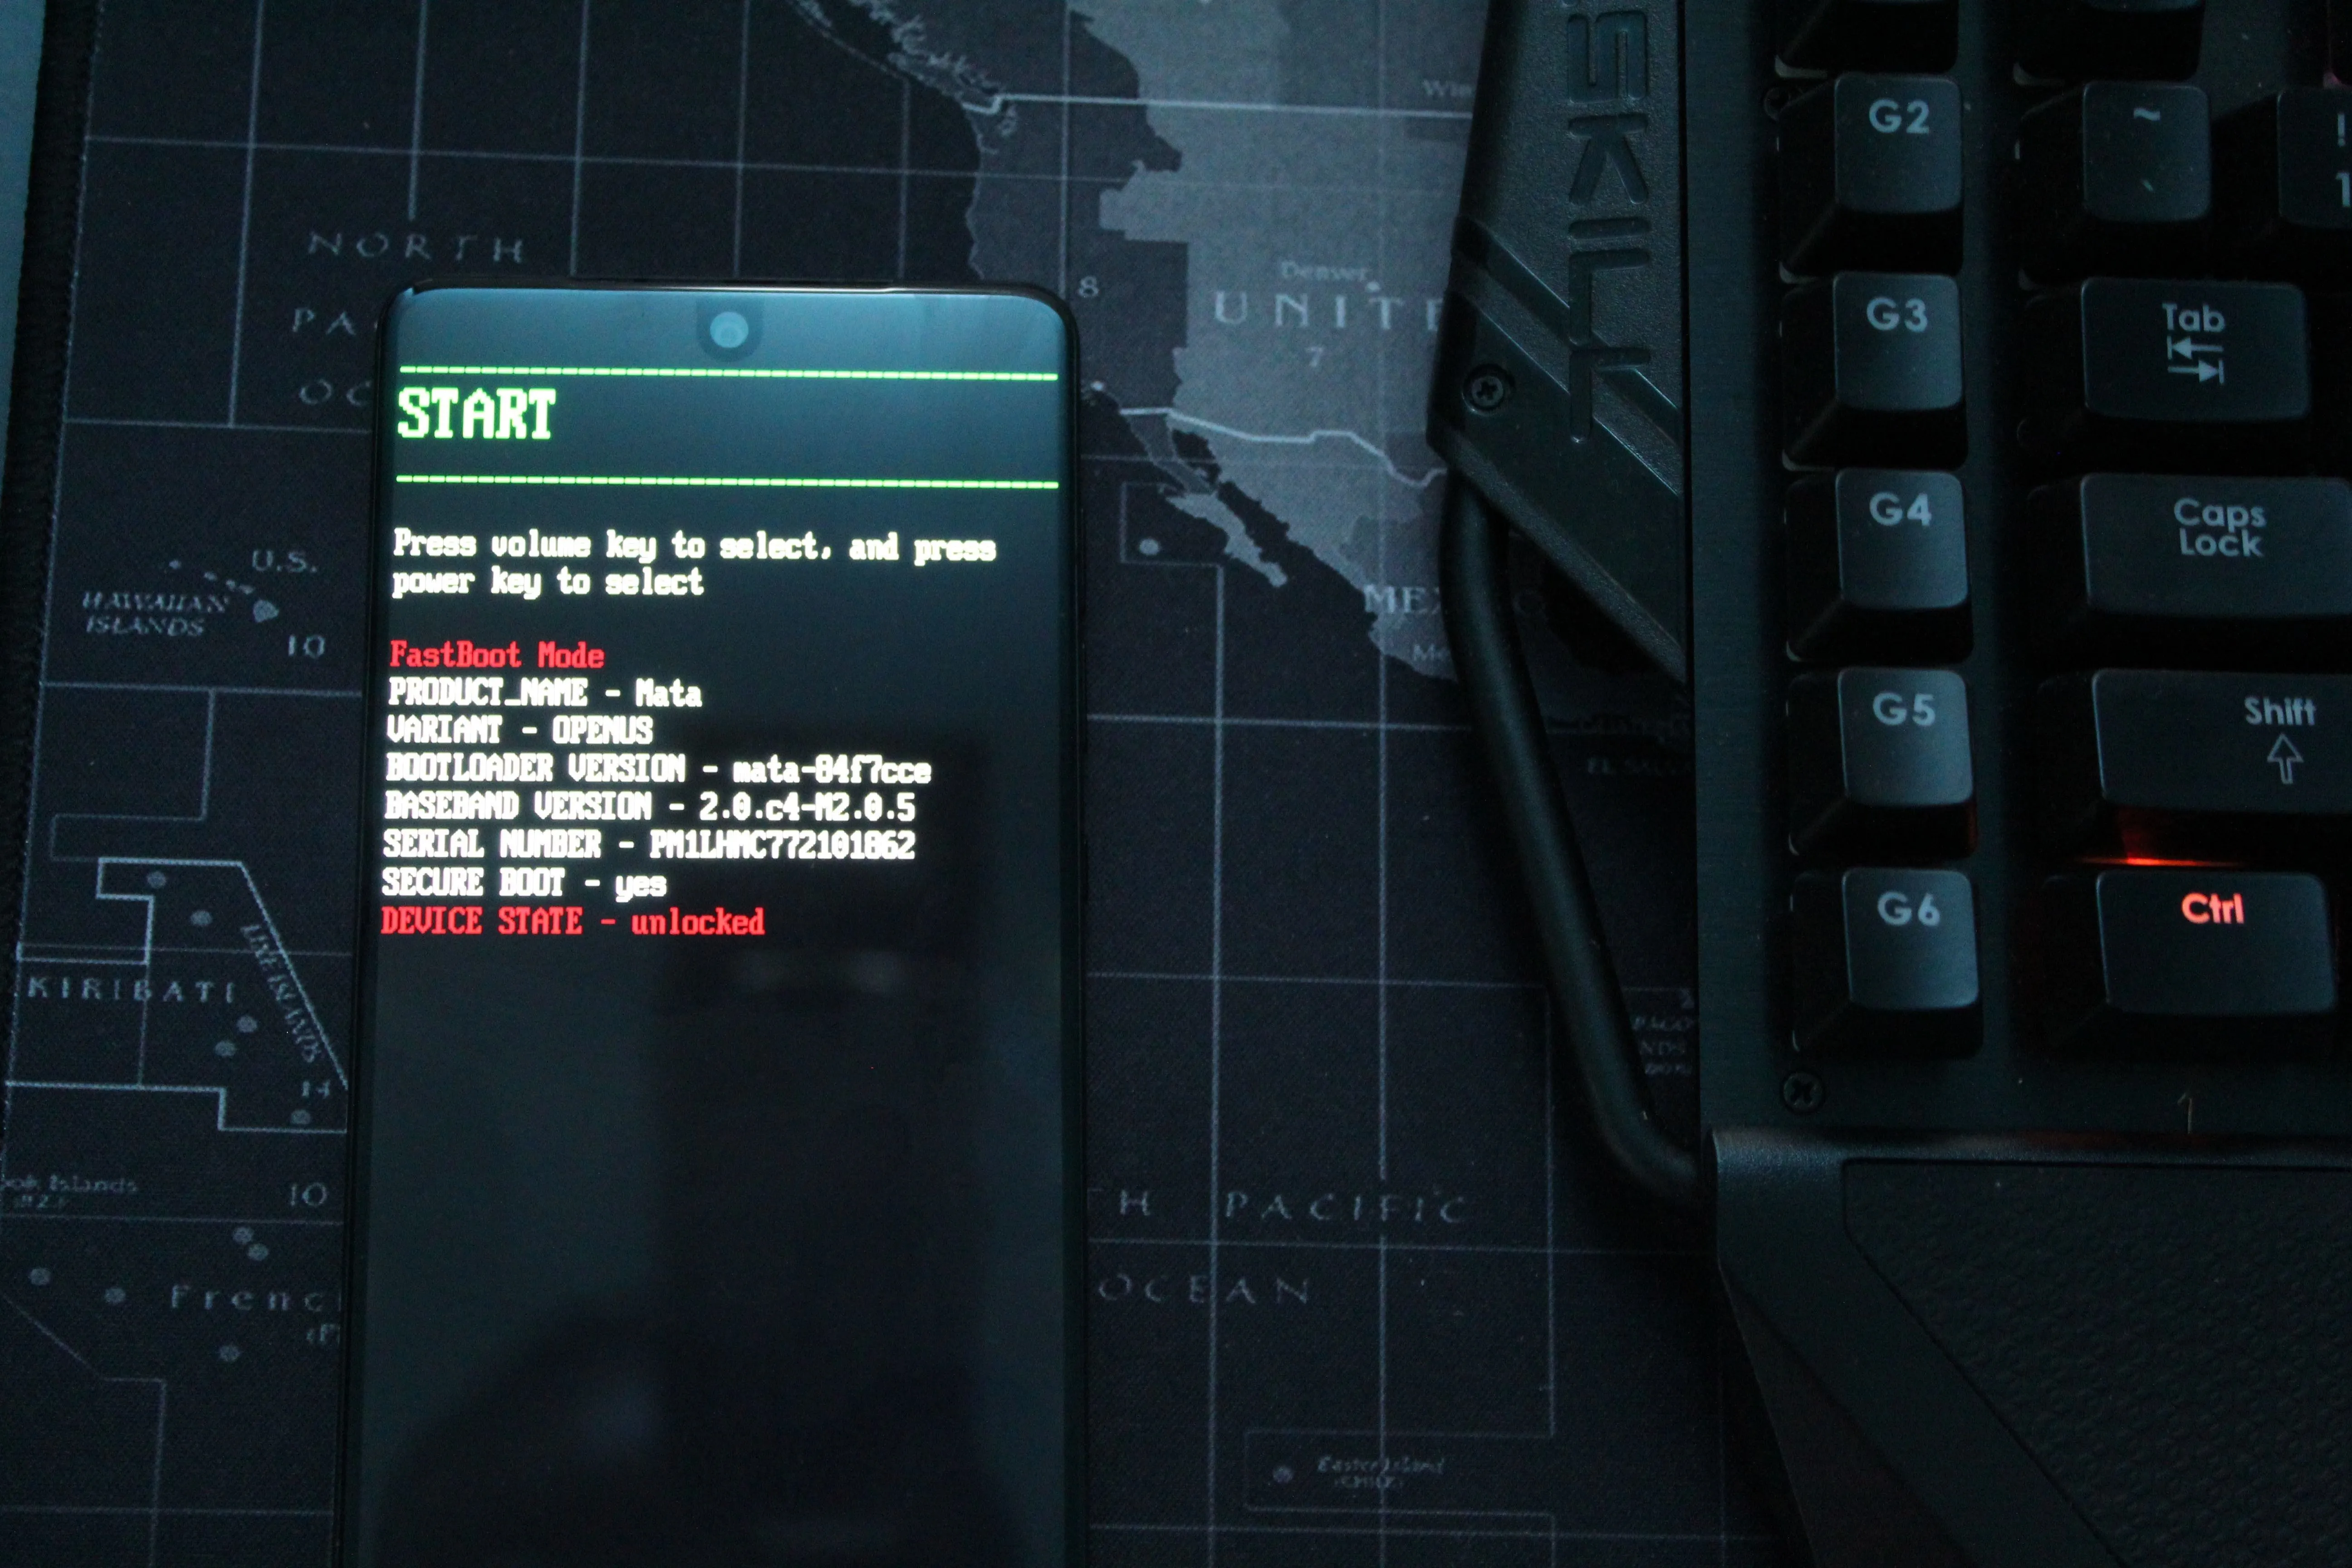
Jon Knight/Gadget Hacks
Verify the Fastboot Connection
First, make sure your Fastboot connection is working by inputting the following command:
fastboot devicesNote: Linux, Mac, and Windows PowerShell users will likely have to add a period and a slash (./) to the front of all commands listed here, e.g., ./fastboot devices)
If you see a series of numbers and letters and the word "fastboot," your connection works and you can continue If not, check your ADB and Fastboot installation and double check your USB cable. I would also recommend switching USB ports on your computer (or even switching computers), as sometimes this will fix any problems.
Find Your Current Boot Slot
Once you've established a connection, input the following command:
fastboot getvar current-slotNote: Linux, Mac, and Windows PowerShell users may have to type ./fastboot getvar current-slot here.
This will reveal the current boot slot your phone using. You may get a FAILED response. If you do, reenter the code and try again until the current slot is revealed. The slot will either be "A" or "B," but take note of which, as you'll need this information later.
Flash TWRP Image File
Now you're ready to flash the base TWRP image file. The tricky part here is you want to flash TWRP to the inactive partition. In other words, the opposite of the value you received in Step 6 above.
So if your active boot slot was "A," enter the following command to flash the TWRP image to slot B:
fastboot flash boot_b twrp-3.2.3-0-mata.imgIf your active boot slot was "B," on the other hand, enter this command to flash TWRP to slot A:
fastboot flash boot_a twrp-3.2.3-0-mata.imgAfterward, you'll need to set the slot that you just flashed TWRP to as the active boot slot. To do so, copy the following command, but don't hit enter yet.
fastboot --set-active=slotNow, replace the word "slot" in the above command with the slot where you flashed TWRP. For example, if your active slot was originally "A" and you flashed TWRP to the "B" slot using the first command above, you would enter fastboot -- set-active=b to make the "B" slot active. After adjusting this, hit enter to send the command. When done correctly, it should look similar to the screenshot below.

Install the TWRP ZIP File
Now that you have the TWRP image file installed on one slot, you'll need to use the ZIP file to install TWRP on both slots. With your phone still on the bootloader screen, use your volume buttons to highlight the "Recovery Mode" option, then press your power key to select it. This will boot your phone into TWRP.
Input your password or PIN and select the checkmark in the bottom-right corner to decrypt your storage and let TWRP access files on your hard drive. You will more than likely find you are unable to use the touch screen. This is because this IMG file was designed for the August security patch firmware. Therefore, the only way to input your PIN or password will be to connect a USB OTG mouse and control the cursor to select the buttons on the keyboard. However, if you don't have an OTG cable or mouse, jump to the last step for a workaround.
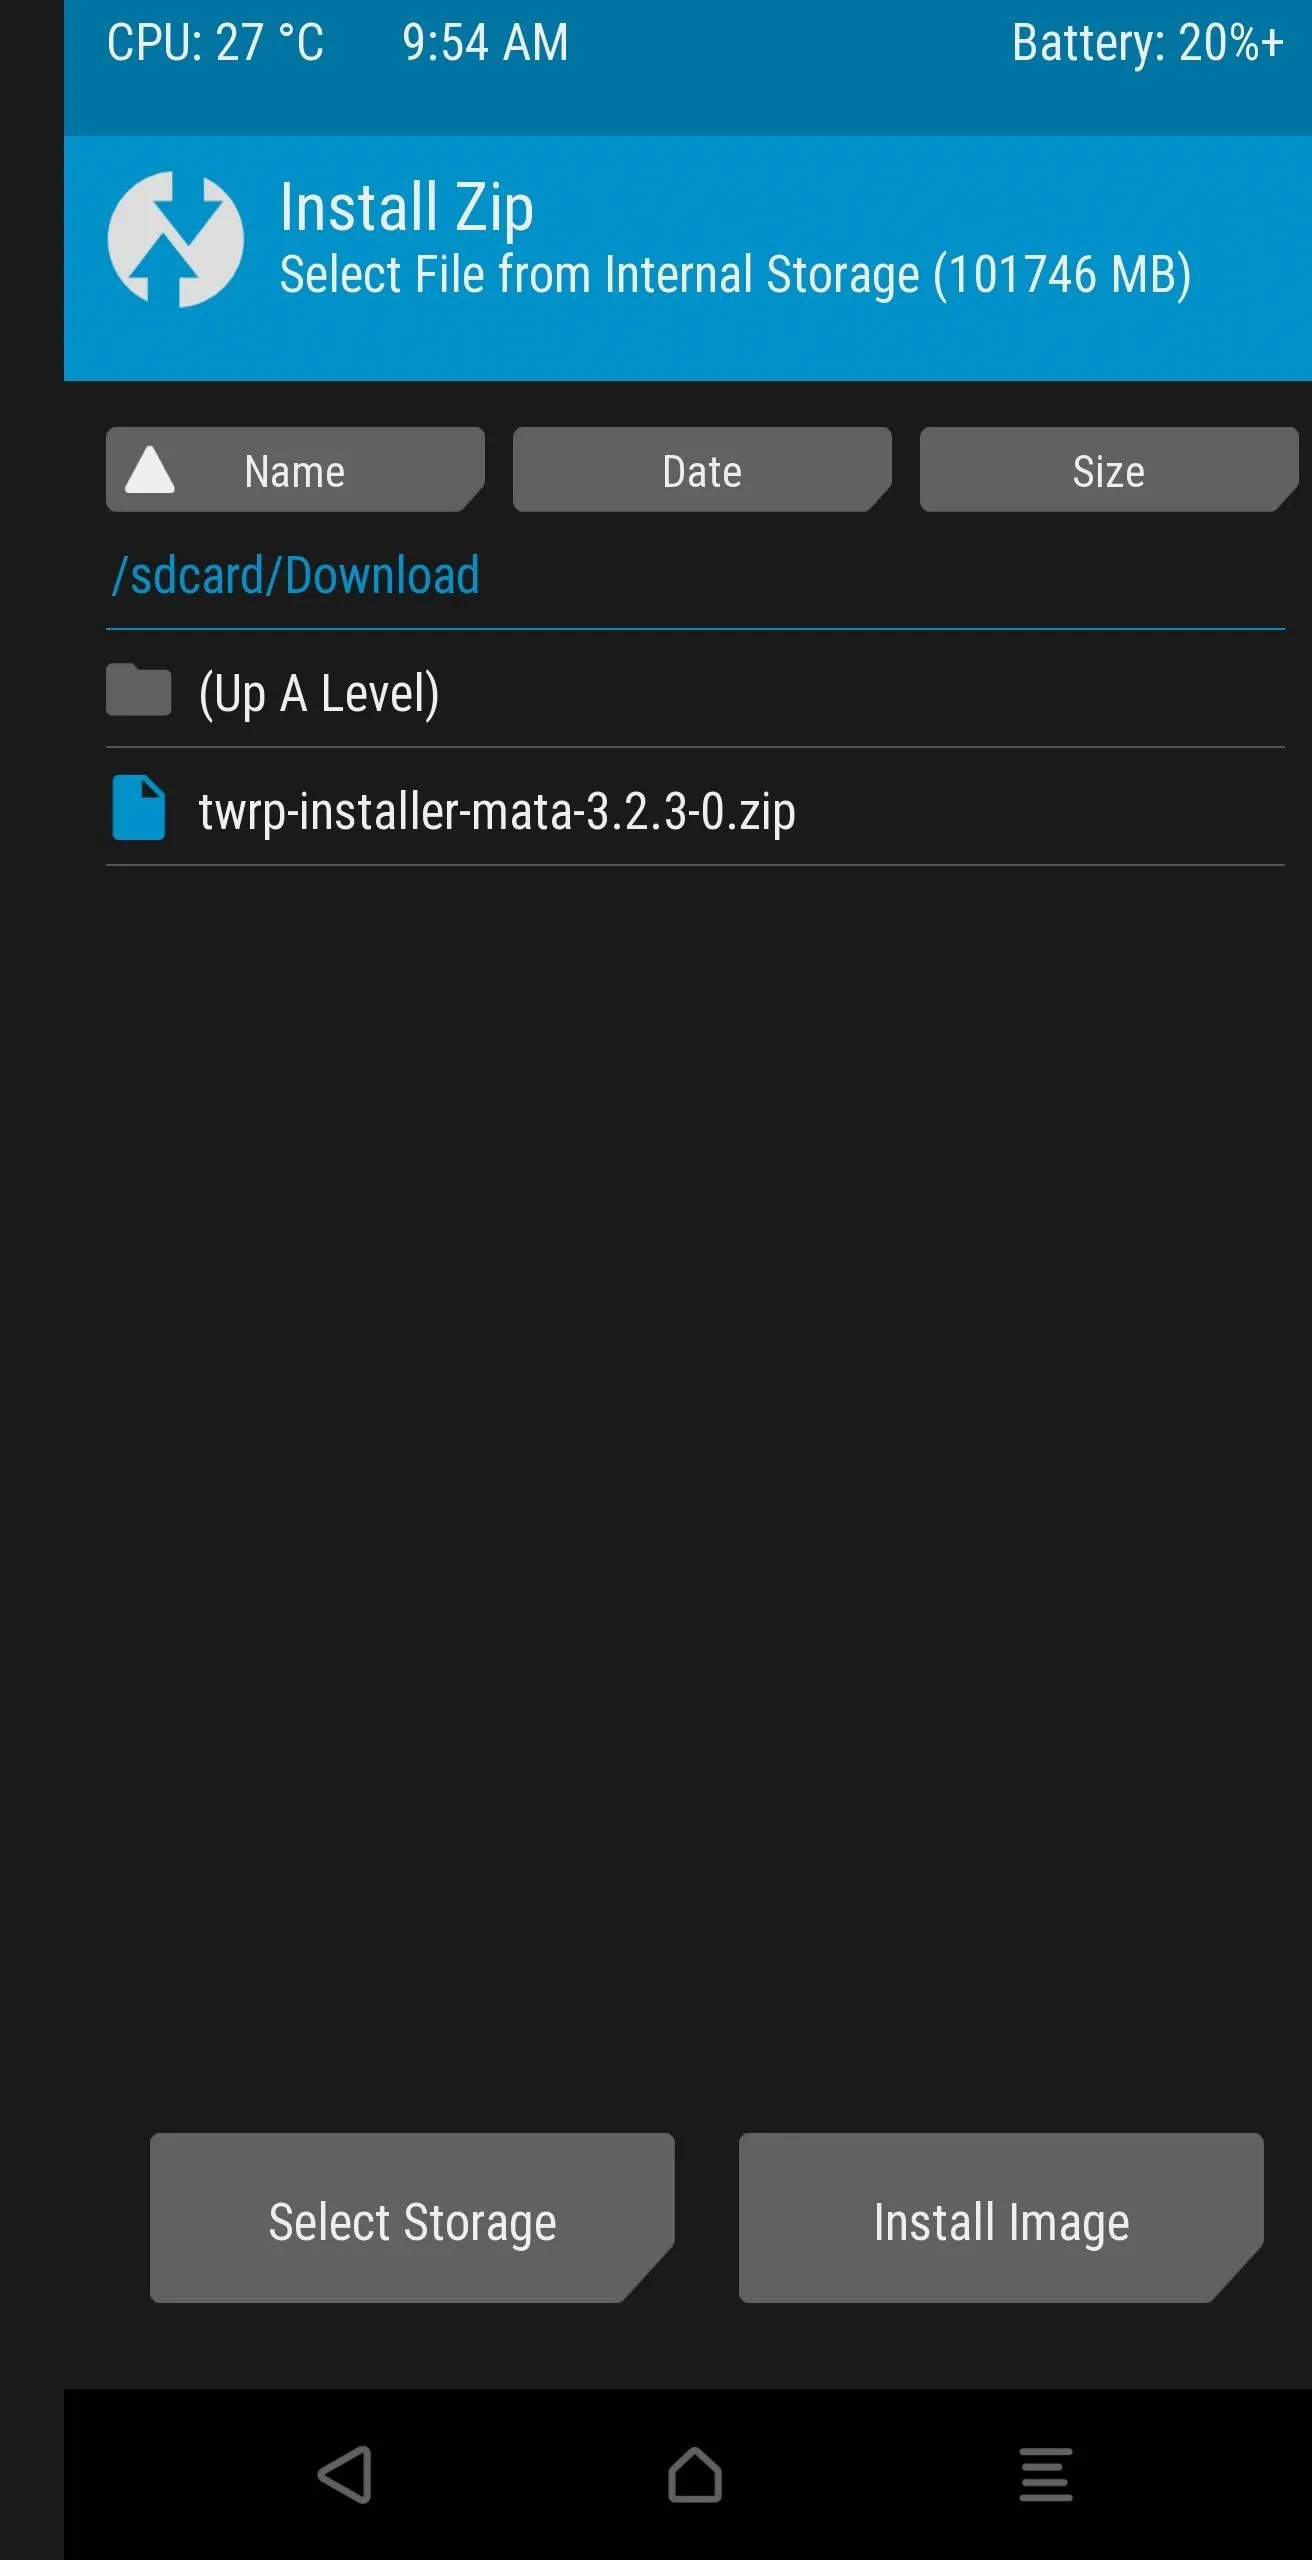
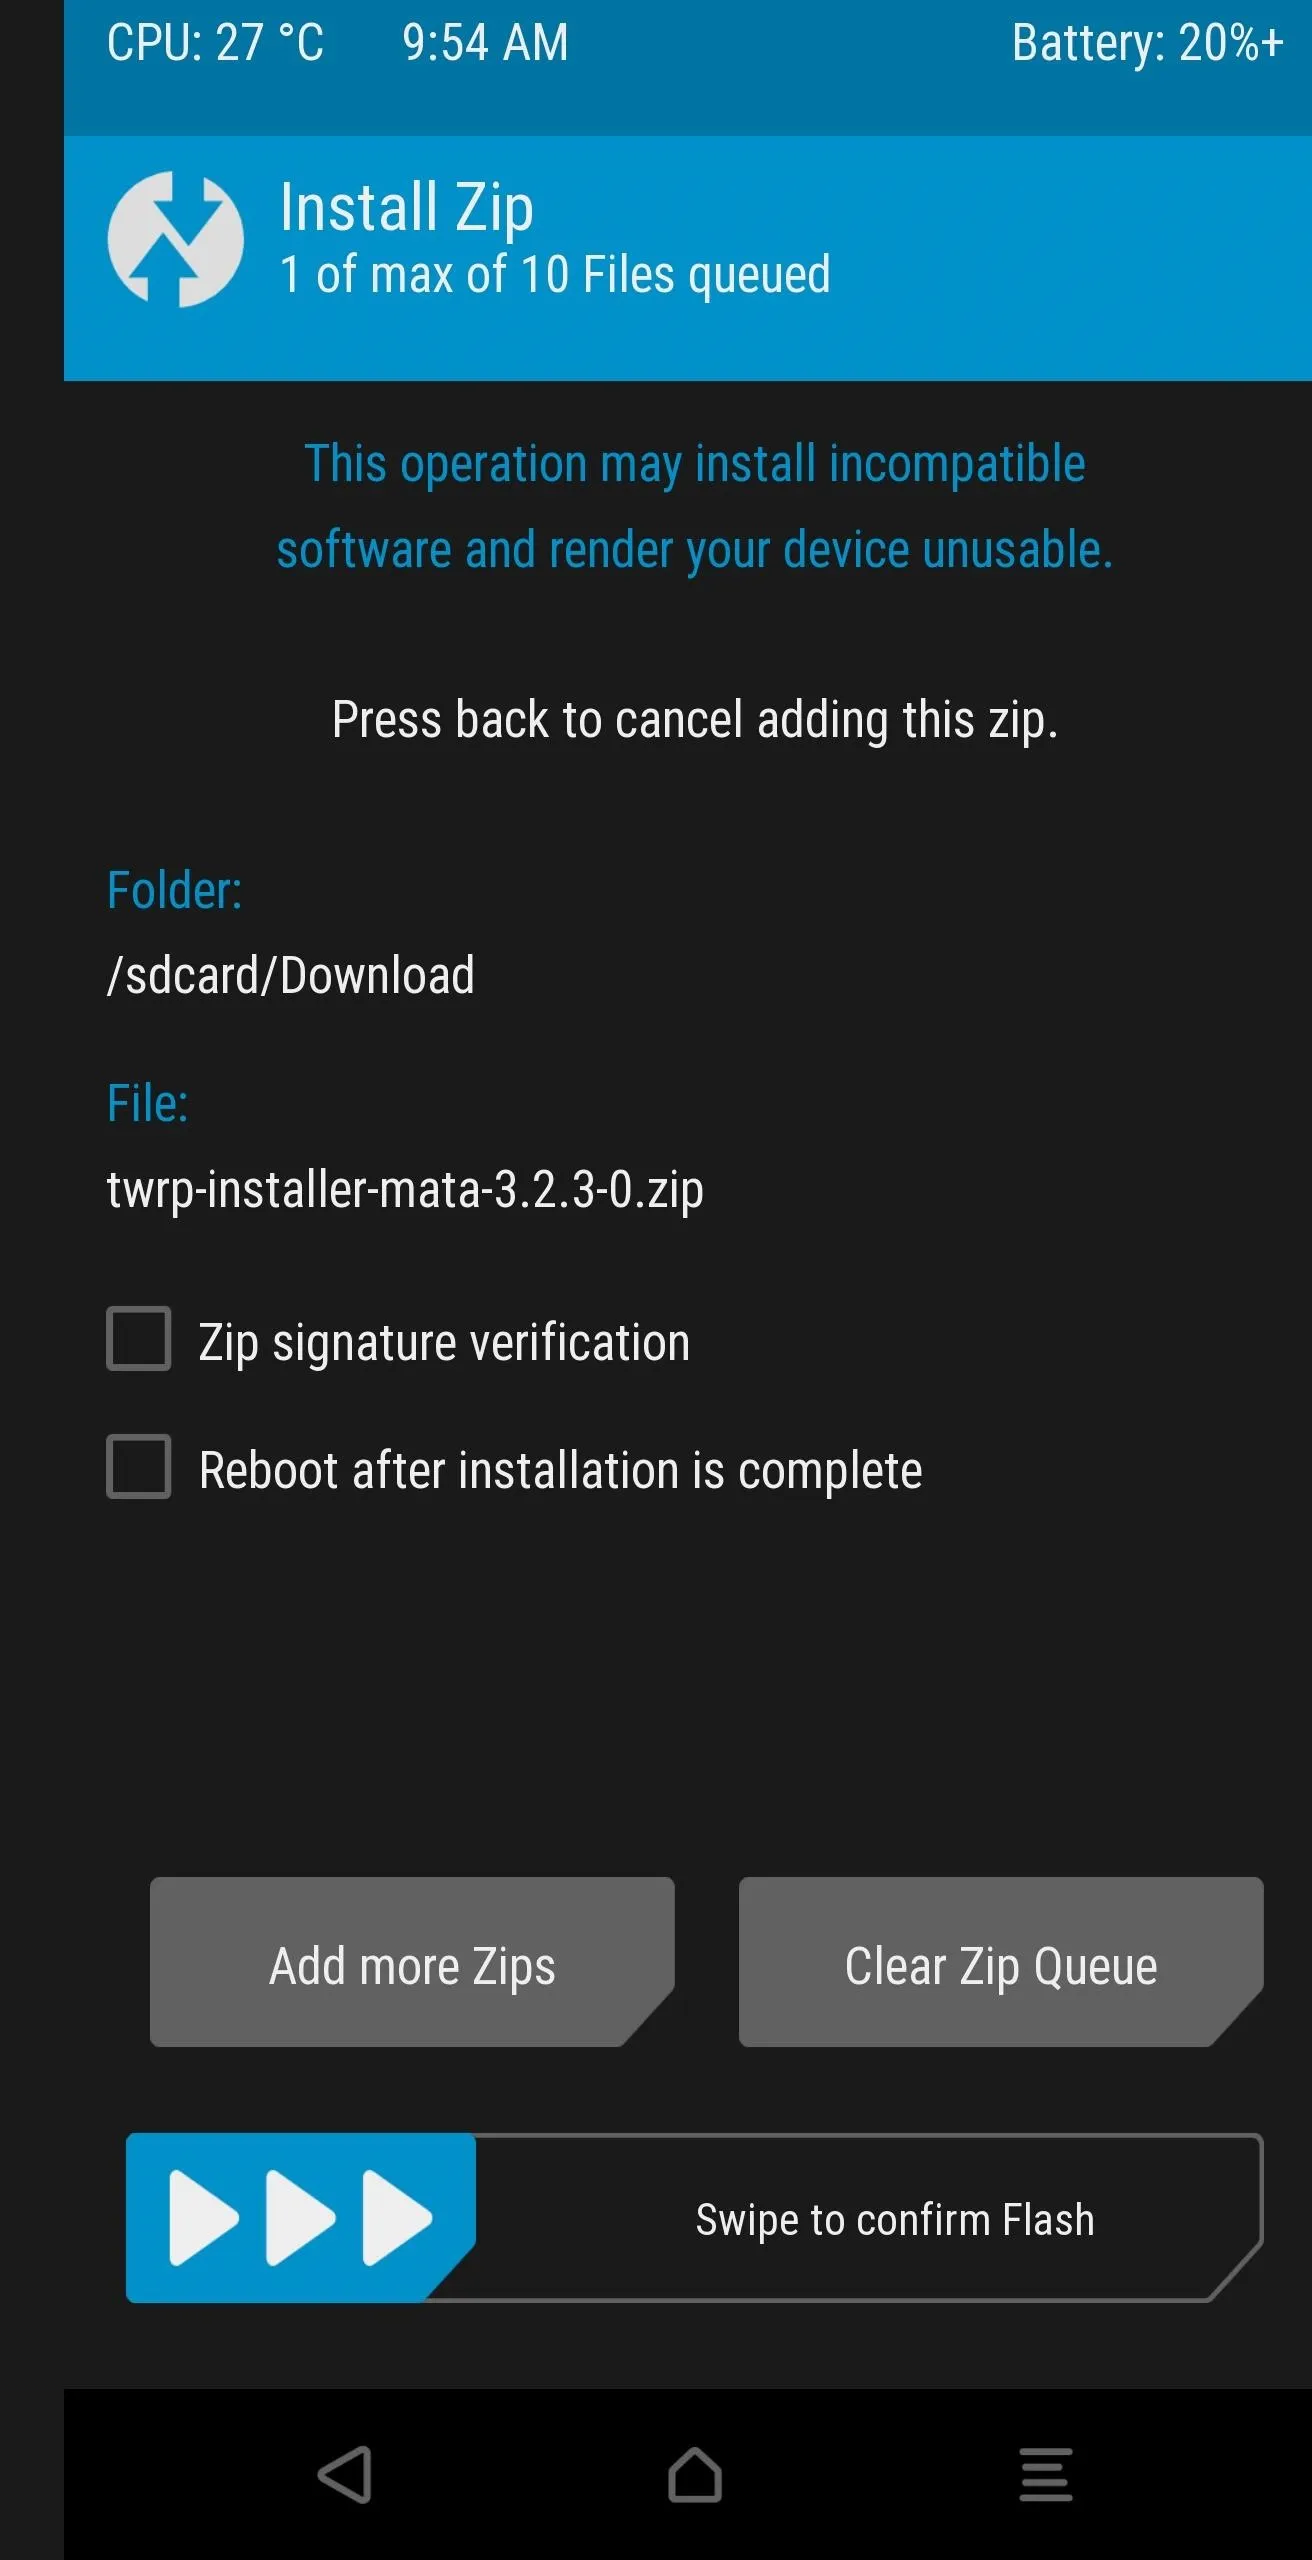
Once you make it to the main menu, choose "Install" and select "Download" from the list of folders. Select the TWRP ZIP file you downloaded in Step 2, and with both checkboxes left blank, swipe the blue toggle to the right to confirm.
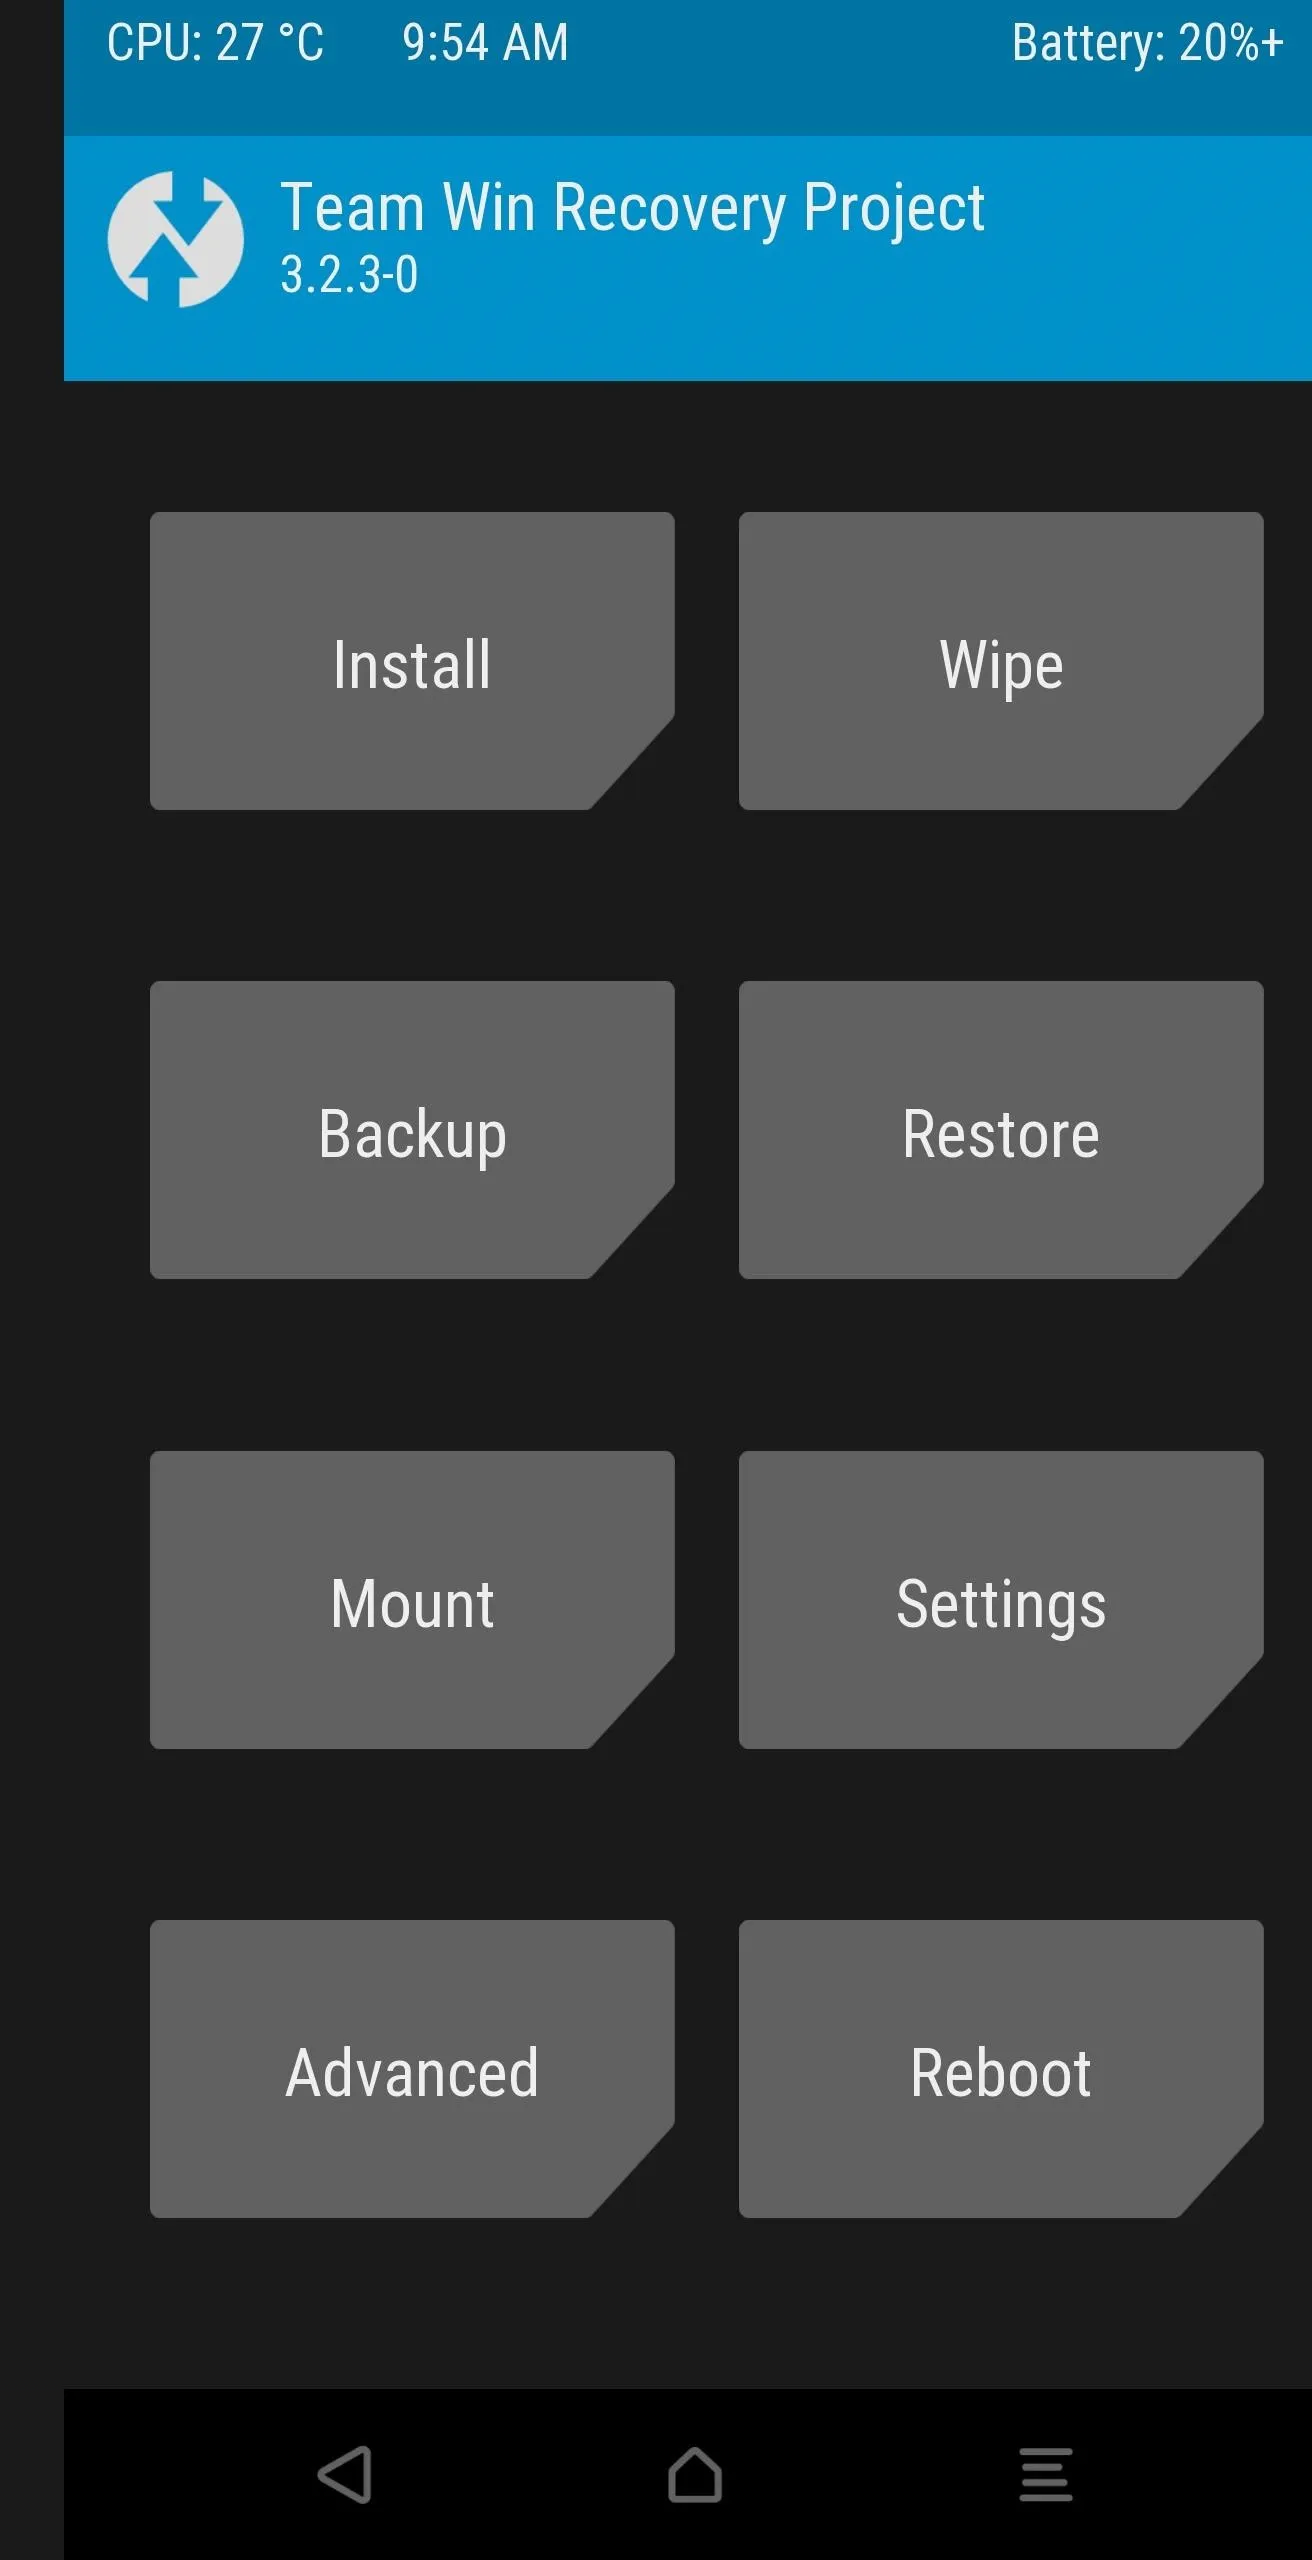
Once completed, select back until you return to the TWRP's main screen. Choose "Reboot" to enter a submenu. Along the bottom should be the text "Current Slot: X" with X representing whichever slot you are on now. Since you are in currently in the slot opposite of the operating system, you'll want to reboot to the other one now that TWRP is installed on both slots.
Reboot to the slot you were originally on (the opposite of the slot you are currently on) using the corresponding button. Your phone will reboot and return you to the Android lock screen.

Install TWRP Without a USB OTG Mouse
If you are running into the issue of not being to use the touch screen to enter your password or PIN after flashing the IMG file and you don't have a USB OTG mouse, you will need to keep your phone connected to your computer after flashing the IMG and input the following commands one by one once you reach the prompt for the password or PIN from TWRP (remember, Mac and Linux users need to input "./" before "adb"):
adb shell twrp sideload
adb sideload twrp-installer-mata-3.2.3-0.zip
Once installed, return to the bootloader by using the following command:
adb reboot bootloaderFrom here, return to TWRP and switch to the active slot using the instructions in Step 8, and the touch screen will work.
And that's it. With TWRP installed on both slots, you can take advantage of additional features offered by the custom recovery. You also now have a decision to make. Do you root with Magisk or another tool like SuperSU? Do you keep the stock ROM or use a custom ROM? The choice is yours.
- Follow Gadget Hacks on Pinterest, Twitter, YouTube, and Flipboard
- Sign up for Gadget Hacks' daily newsletter or weekly Android and iOS updates
- Follow WonderHowTo on Facebook, Twitter, Pinterest, and Flipboard
Cover image and screenshots by Jon Knight/Gadget Hacks


Comments
Be the first, drop a comment!