


The software released in the 2015 iterations of the Samsung Galaxy line of devices—the S6, S6 Active, S6 Edge, S6 Edge+, and Note 5—have some pretty neat camera features that give these devices arguably the best smartphone camera on the market today.
Out of the box, Samsung's shooters take some of the best, no-brainer pictures around. But rather than just pointing-and-shooting, you can improve the quality of your photos by using some of the built-in tools and effects. Below, I'll break down the basics of the Galaxy camera and show you how to get the most out of its features.
Master the Basics
The first step to mastering anything starts with mastering the basics. So let's have a look at the basic interface on the top of the camera screen.

Flash
Starting with the top menu, tap the flash lightning icon to set the flash to auto, on, or off.
Timer
The stopwatch icon sets a timer to a specified number of seconds, either 2, 5, or 10 seconds. This will cause the phone to wait that many seconds after pressing the shutter button until it actually takes the photo.
HDR
HDR, or high dynamic range imaging, tweaks the ratio of light and dark in real time in your shots to optimize the realism and color quality of your images. When active, your device takes three shots at different exposures and blends them together to create a theoretically more realistic photo.
It's recommended to use HDR for landscape shots, low-light shots, and shots with a lot of sunlight. Basically anything where the light is on an extreme one way or the other, you should use HDR to level it out.
On the flip side, it's not recommended for photos with movement or a lot of really bright and vivid color, as it can wash out those types of pictures. Think soccer games or an array of flowers.
The auto setting should, in theory, detect when to turn HDR on or off based on the light, but there may be situations where you want to toggle it yourself for the best-looking shot.
Effect
The Effect button enables the addition of filters to your photos that gives them a unique look, à la Instagram.
Just tap Effect and choose your desired filter, and you can even hit the Download icon to go to the Samsung App Store to download additional ones.
Get to Know Your Settings
Tapping the gear/cog icon in the upper-left hand side of your camera app will take you to its settings, which allow you to tweak the basic functionality of the camera to better suit your needs. Here, we'll take a look at some of the features offered.
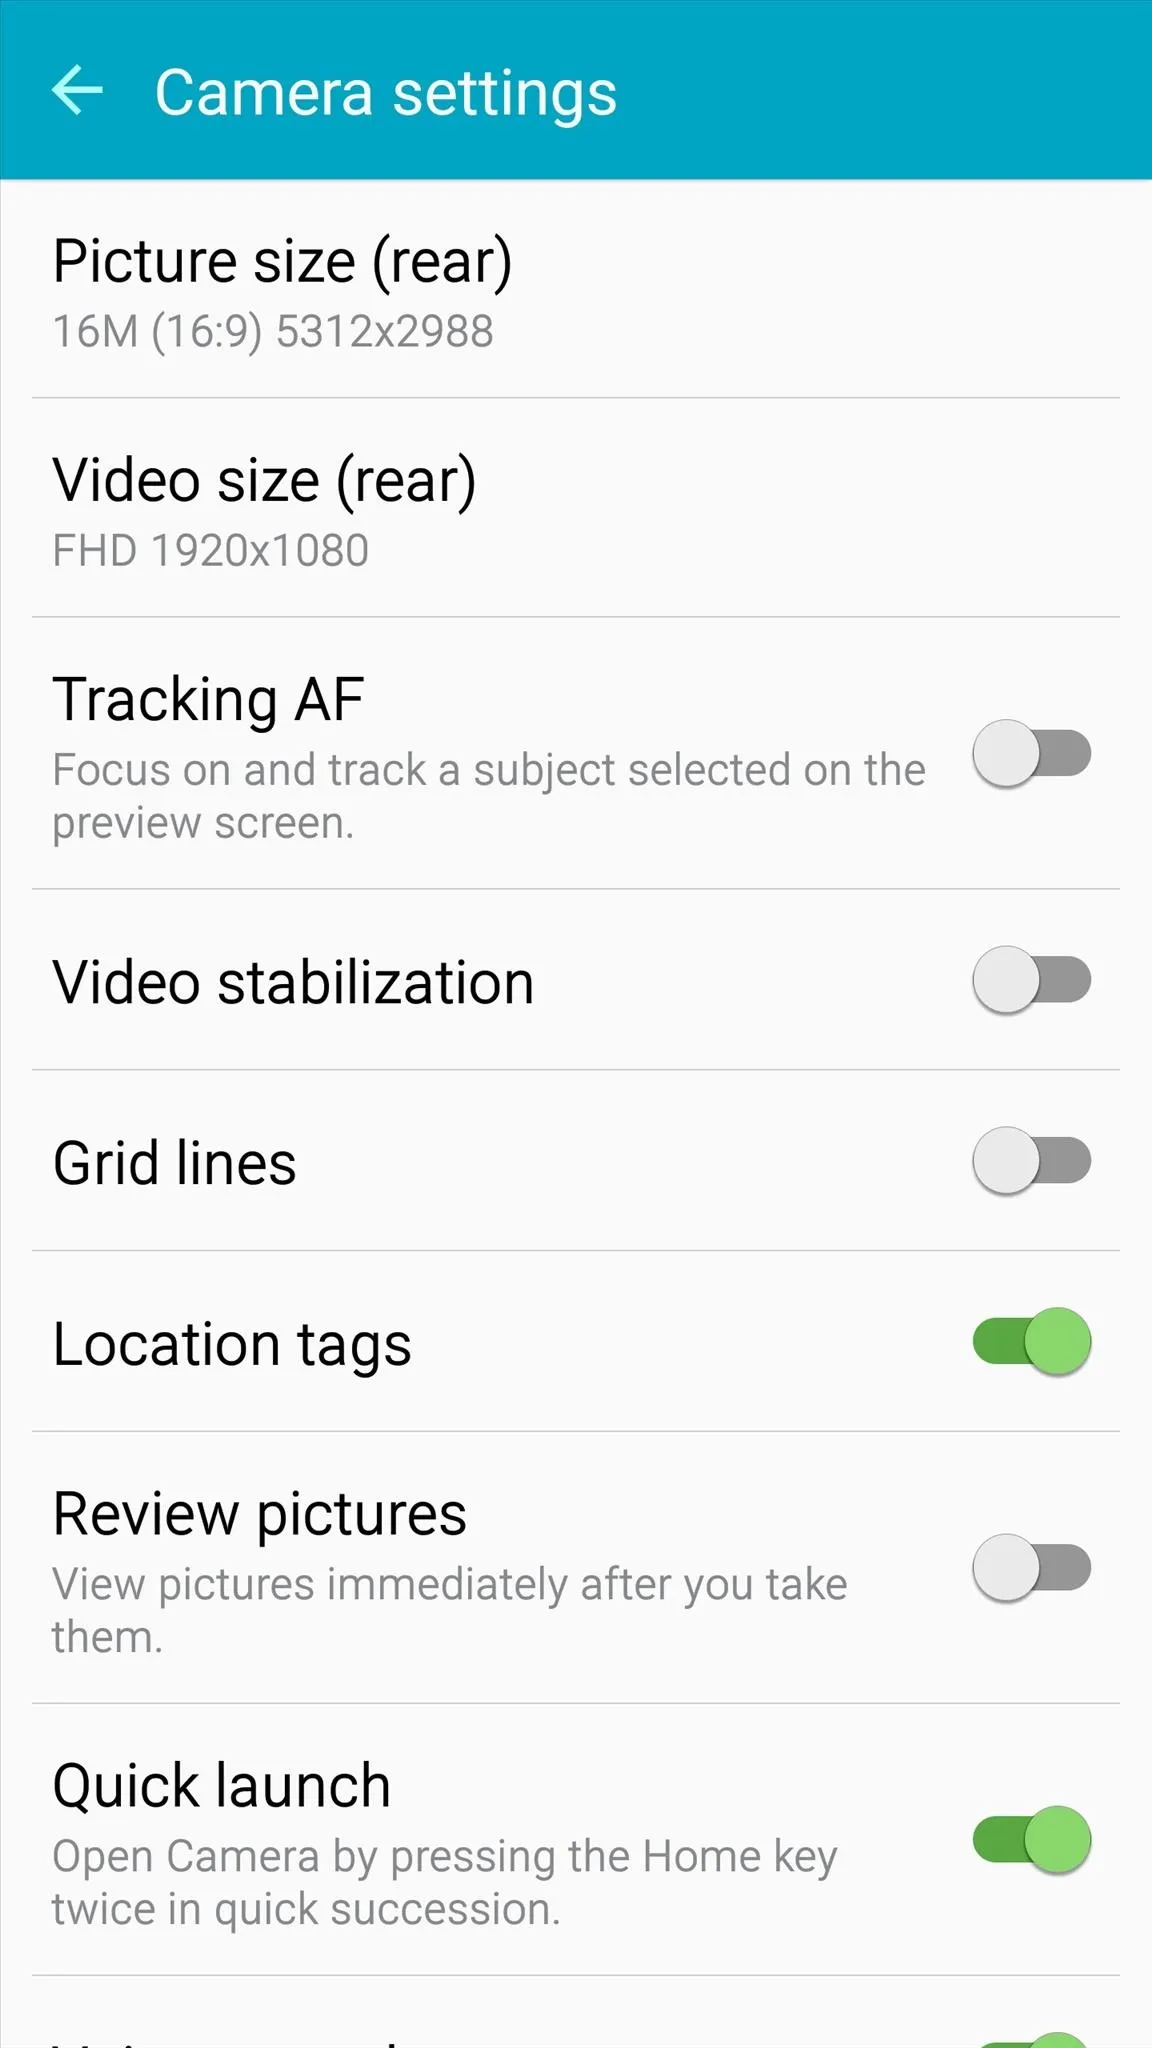
Picture size
This setting controls the picture size taken by the camera. Raising or lowering this value (to a maximum of your camera's max resolution) will respectively increase or decrease each image's file size and the picture quality.
Usually, there's no reason to adjust these values unless you want to save storage space or want to adjust the aspect ratio of your pictures.
Aspect ratio is the orientation. Looking at the screenshot above, you can see that the setting being used is 16M (meaning megapixels) with an aspect ration of 16:9.
The 16:9 ratio is the same widescreen aspect that your 1080p screen uses. If you wanted to change it to 4:3 (think old-school non-widescreen TVs) or 1:1 (square size), you can do so in this setting.
Video size
Similar to picture size, this setting will control the quality of videos shot on your device. Lower this to reduce the file size of your videos at the cost of quality. You can even increase this from the default on many devices to shoot videos up to 4K quality at higher frame rates. Just know that 4K videos take up a lot of storage.
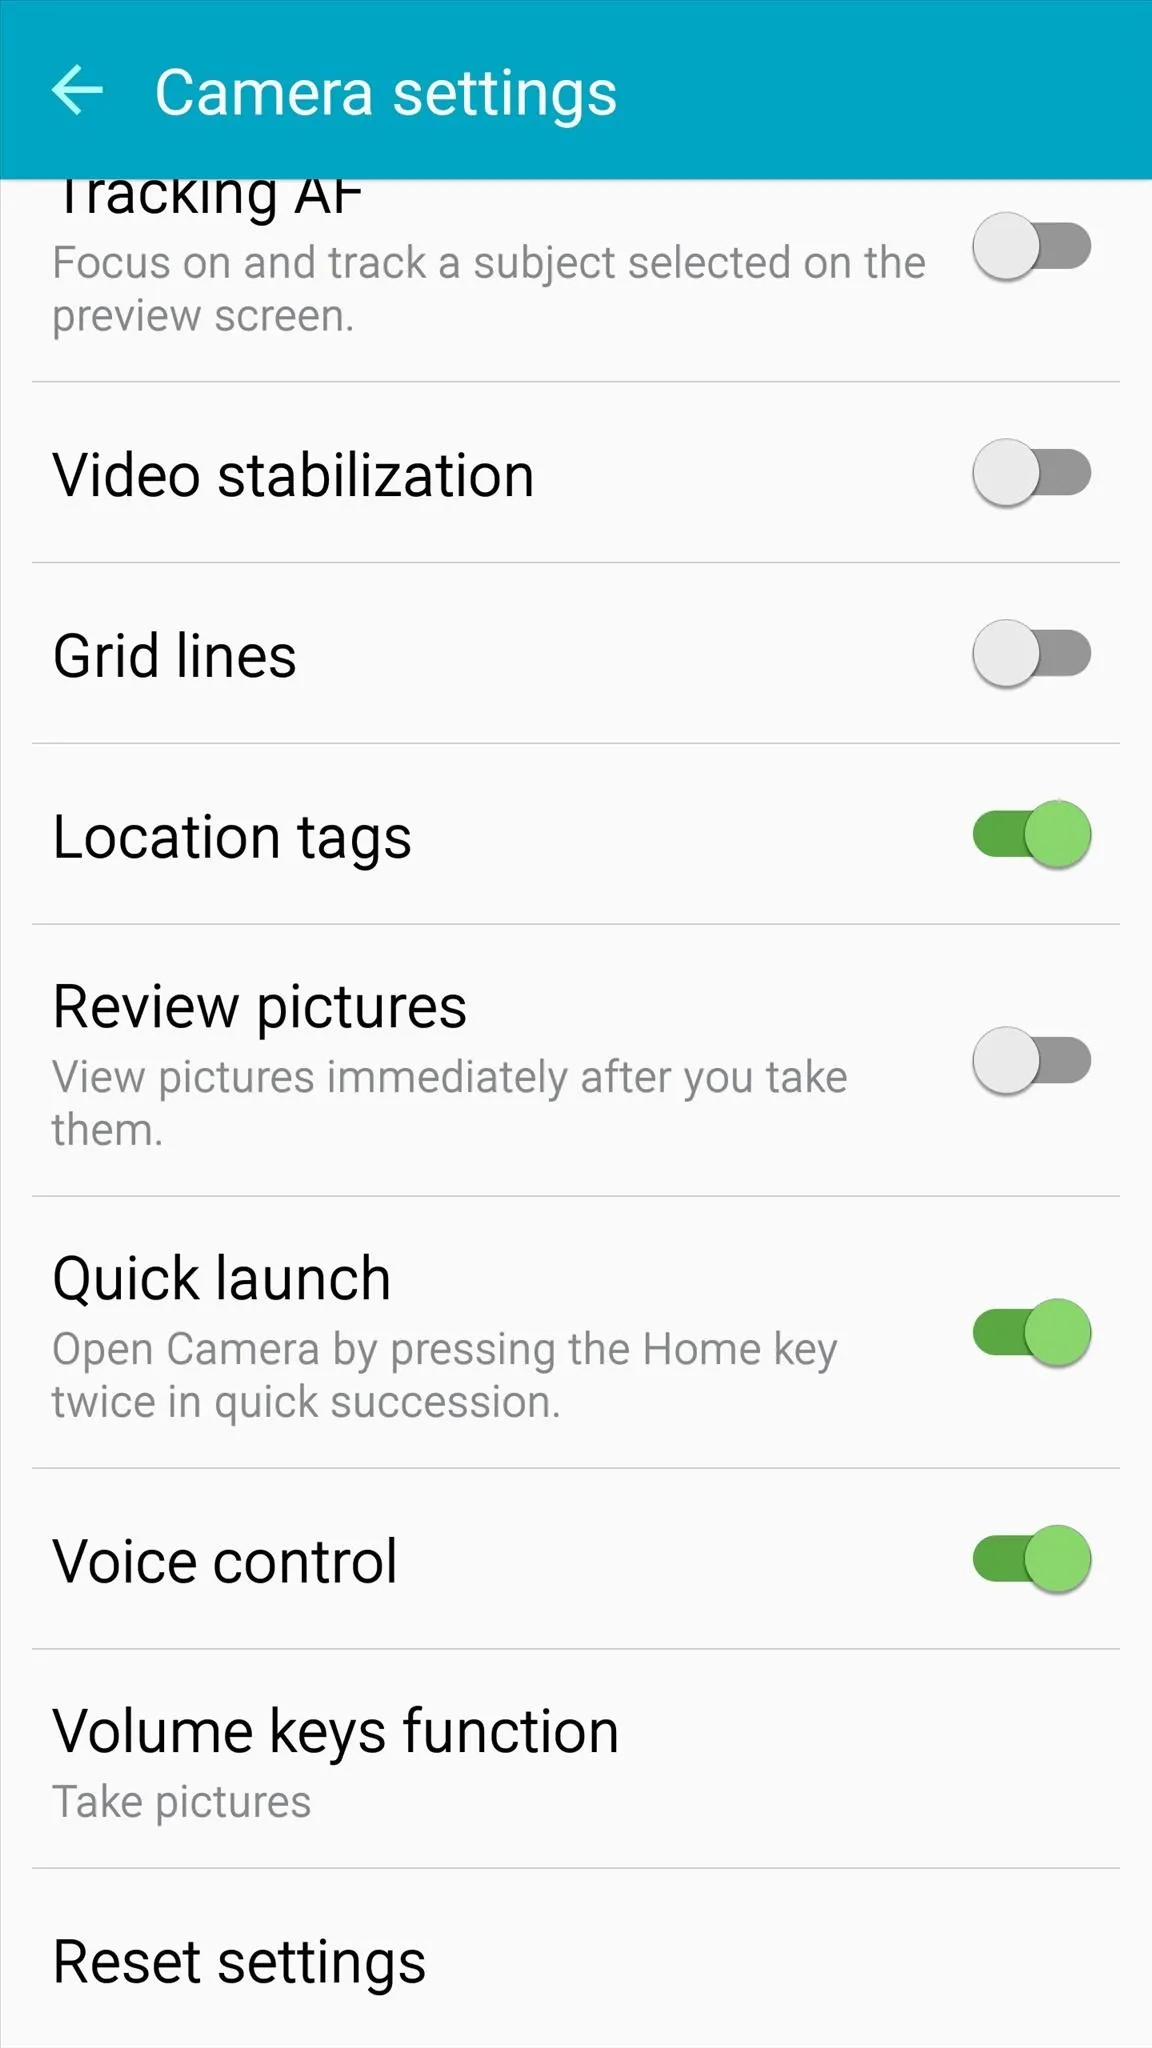
Tracking AF
This option, Tracking Auto Focus, is used to track a single object that you tap on the camera screen and maintain focus on that object regardless of where it moves or what else happens. This is a feature common to expensive DSLR cameras and is best enabled when wanting to shoot moving objects. The device will track and maintain focus on the object automatically.
Video stabilization
This will theoretically smooth out some of the shakiness of videos caused by movement of your hand, wind, or whatever. Some people reported this actually makes it worse, however, so try it out before enabling it on a video you need.
Note that video stabilization and Tracking AF cannot be enabled at the same time.
Grid lines
This will show grid lines on your camera screen, which are useful for lining up shots and making it easier to adhere to the rule of thirds.
Location tags
This will add the location that each shot was taken at, using GPS, to your photo's metadata. If you're concerned about privacy, especially when snapping pictures at home, you should turn this off.
Voice control
This will enable the ability to take pictures by speaking a key phrase, which is perfect for selfies and group shots. The camera will take action when it hears any of the following: "Cheese," "Smile," "Capture," "Shoot," or "Record video."
Volume buttons
You can set the volume buttons on your device to snap pictures, zoom, or record video. This can be nice for selfie taking, and certain selfie sticks also require this option to be set to "take pictures" in order for the button on the stick to take the picture.
Learn About Pro Features
If you press the Mode button on the lower-left side of the viewfinder, you'll reach some more features to play with, one of which is Pro mode.
Pro mode is marketed at people who are skilled with digital cameras, but even a average Joe can get some real use out of these features without difficulty.
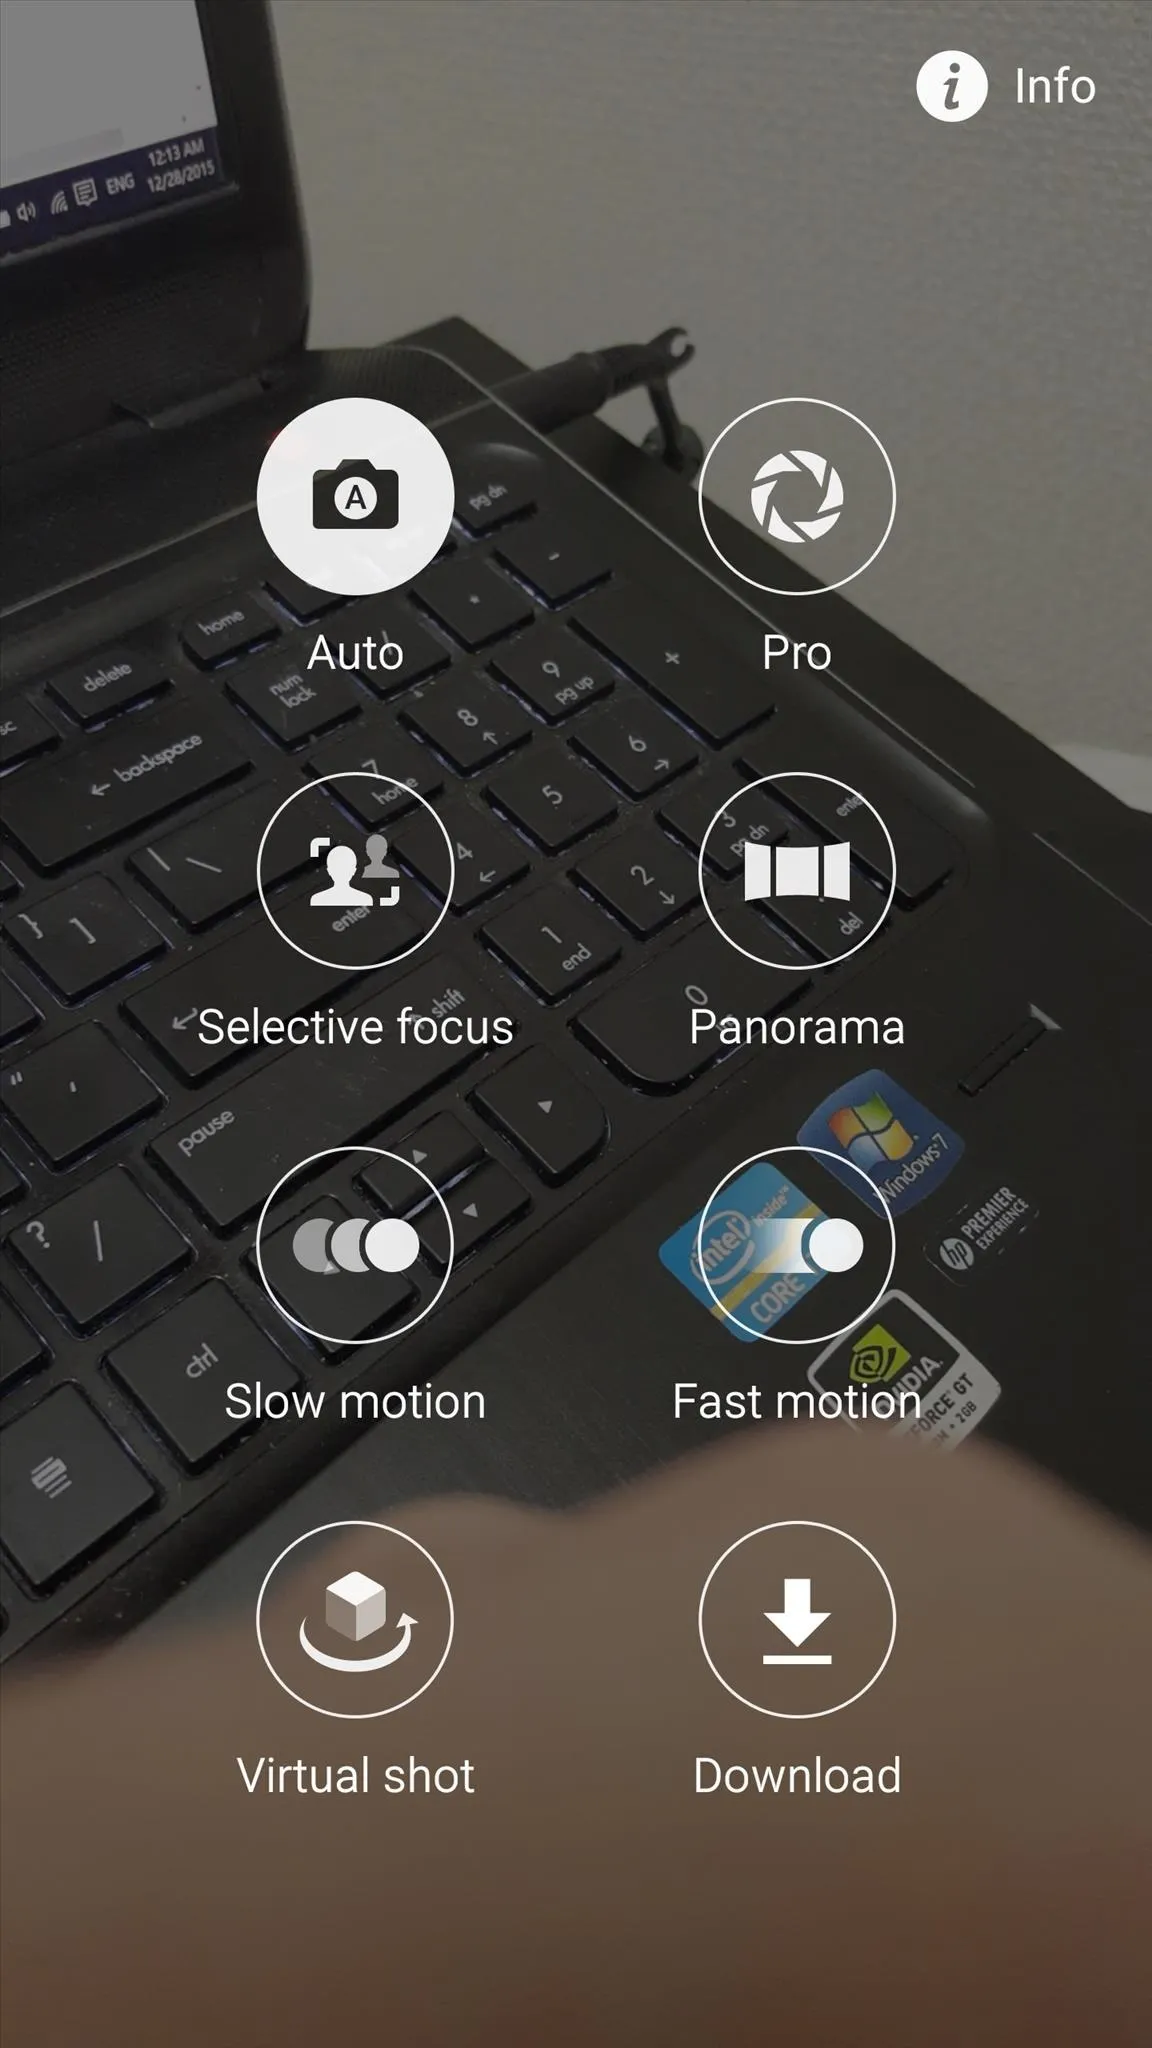
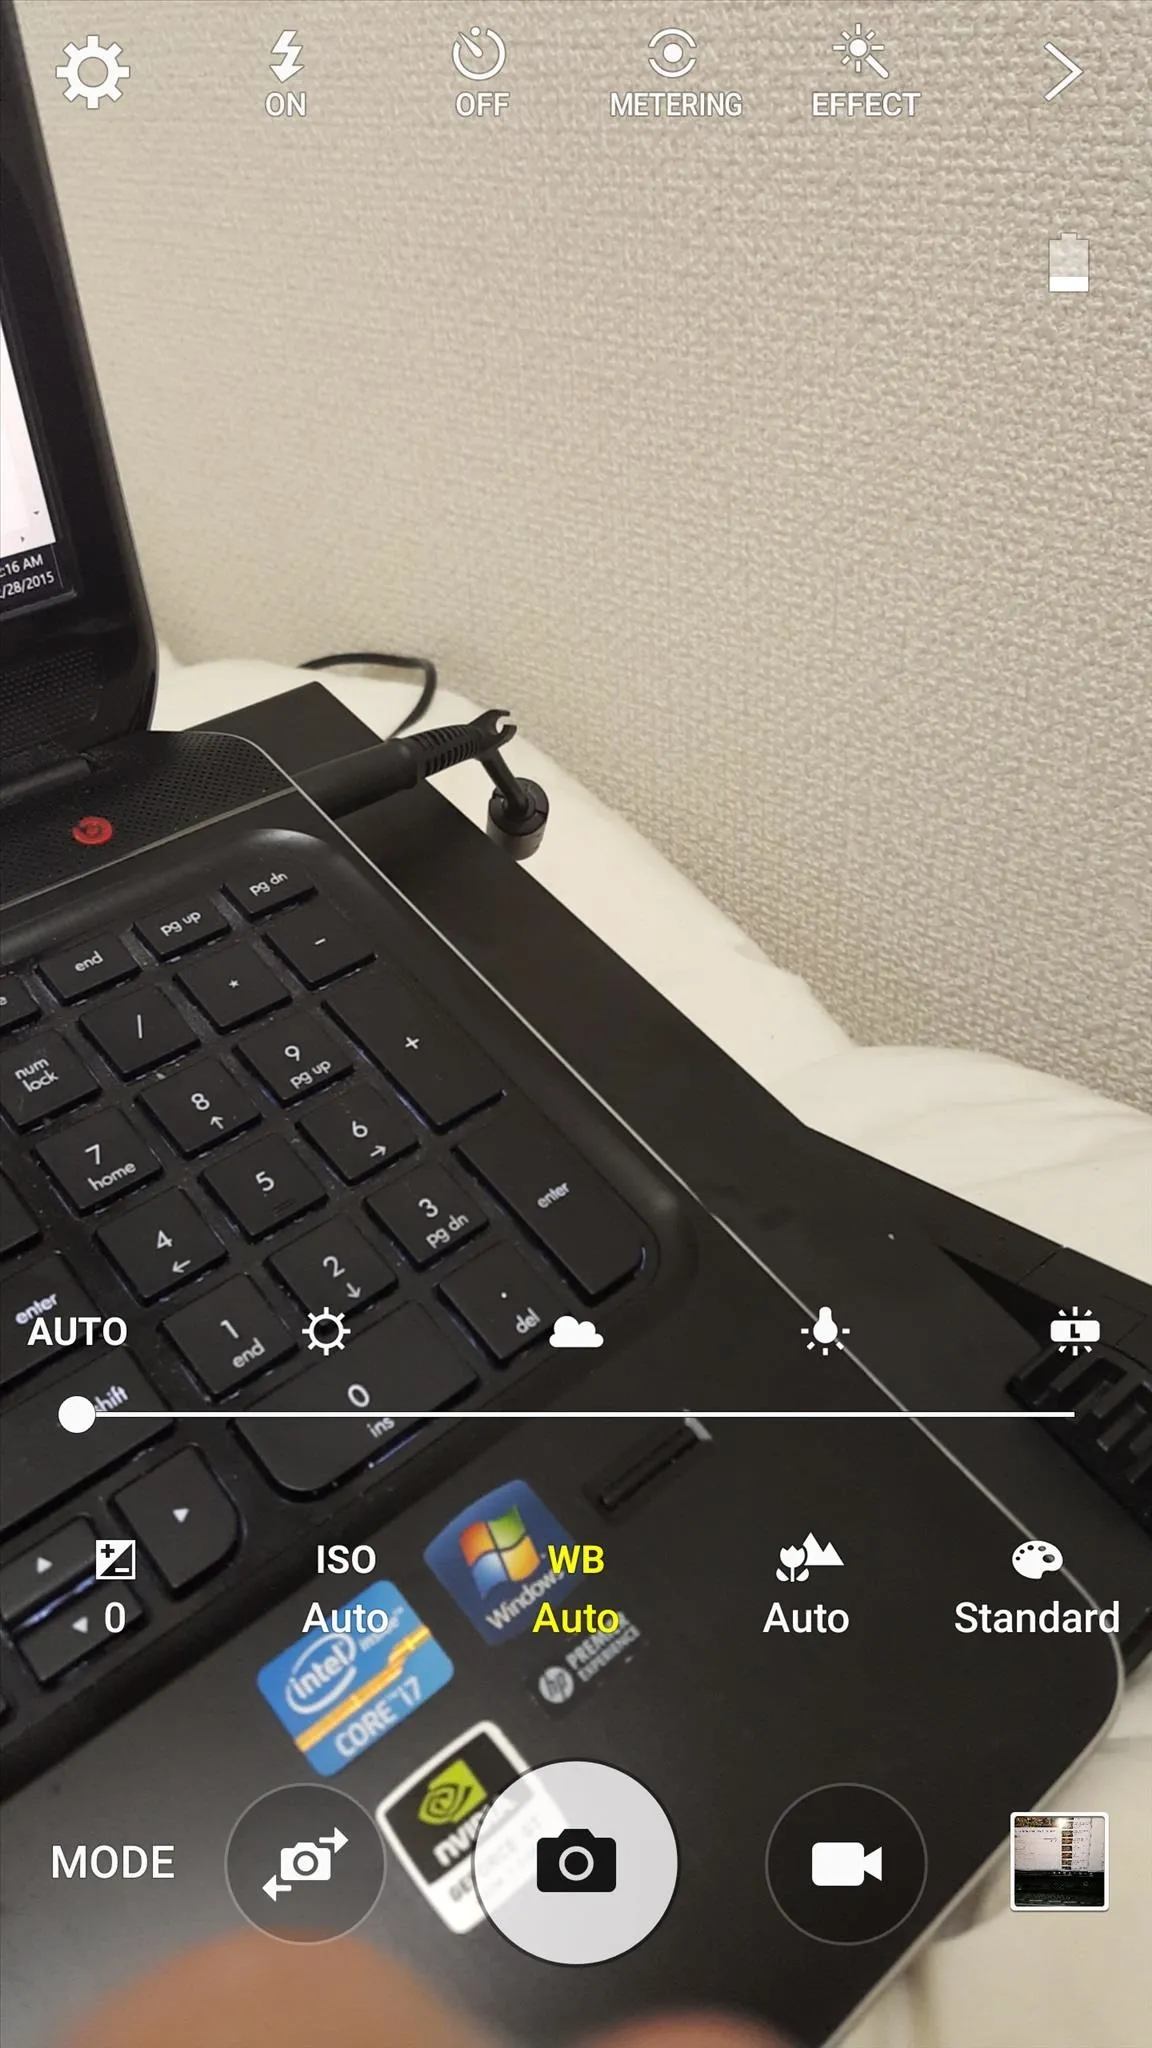
Tap the Pro button in the Mode screen, which will bring you back to the basic viewfinder with an options toolbar near the bottom. You can now adjust these options to fine-tune your image and create the best shot possible.
Brightness
Tapping the +/- button in the lower left will present a brightness slider. Slide left to decrease or right to increase brightness in the shot.
ISO
The ISO button basically controls the sensitivity of your camera to light. Optimizing this value can be tricky as there are times when lower is better and times when higher is better. It all depends on the lighting.
In high light, the lower the ISO, the better the image quality generally is. For shooting indoors without a flash, higher ISO is probably going to improve quality of shots.
In low light, auto is probably good enough, but for taking pictures outside on sunny days, try lowering this setting manually to see if it improves the quality of your shots.
WB
WB stands for "white balance," and it controls the tint of your pictures. You can try playing with different settings to optimize the color of your image, or use it to add interesting colors to your images.
The options are auto, daylight, cloudy, incandescent, and fluorescent, based off of the type of lighting you're shooting in. Try playing with these settings for some cool effects or to bring out the natural colors in your photo.
Focal length
The focal length option is the icon with the mountain and the flower. Generally, the more towards the right you slide this slider, the better it focuses on far away objects.
This setting disables the auto tap to focus feature and enables you to fine tune your focus by adjusting the slider until the object you want in focus is crystal clear.
Filters
The art pallet icon will allow you to swipe to cycle through and tap to select a filter for your shot. Think Instagram because it's basically like those filters.
Metering
On the top of your screen, you'll see a circle icon that says "Metering." This is a very advanced feature that controls how the sensor chooses the amount of exposure. You have three choices: Center-weighted, Matrix, or Spot.
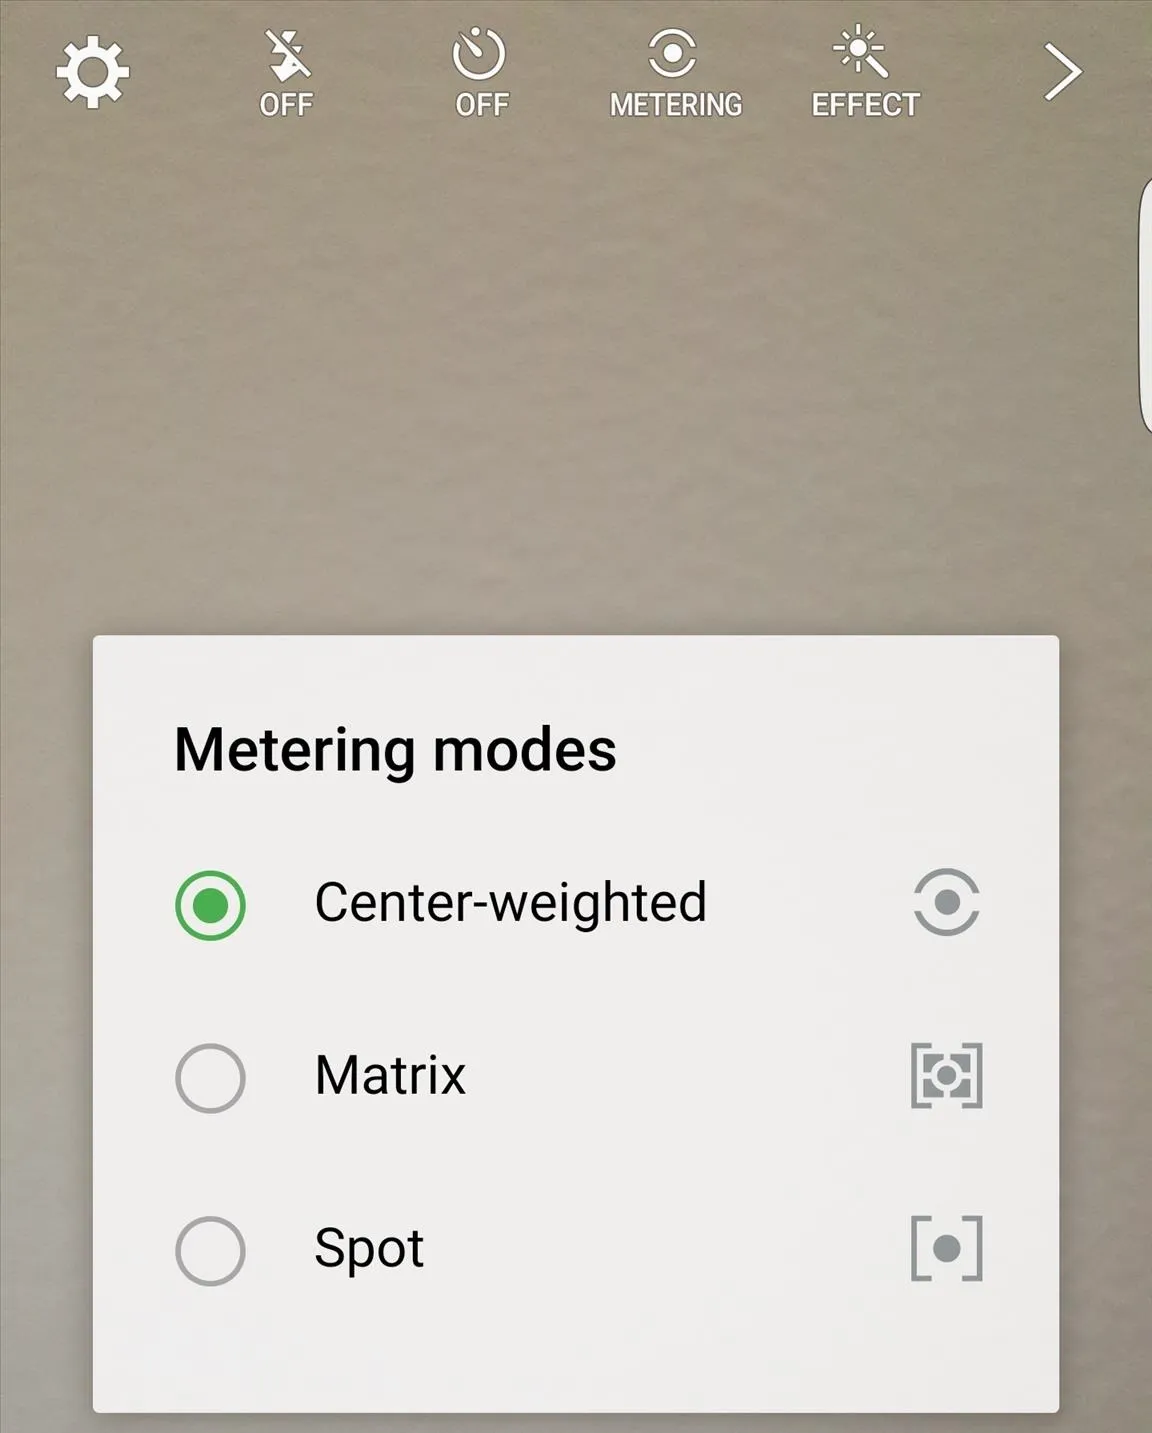
In center-weighted mode, the camera focuses on a circle about 60-80% of the total photo size centered at the exact middle. It's best used for scenes that have one clear focal object near the middle of the frame. Background light won't affect the exposure as much, so it's really good for high light or high contrast shots.
Matrix mode shines in evenly-lit settings. It's the common "set it and forget it" setting professionals use, but it isn't the default on many smartphones. However, it's a very strong choice for people wanting great landscape shots in even light or in situations where it's not obvious which metering setting you should use and you need to take good quality shots quickly.
Spot metering determines the exposure based on a tiny point about 5% of the total shot size in the center of the image. This is a very high level setting and is best left to pros who know how to use it properly. For those snapping shots quickly, you'll probably get really mixed results with it. For the average joe, though, it can really emphasize a large object in the center of the frame, like the moon in a starry sky.
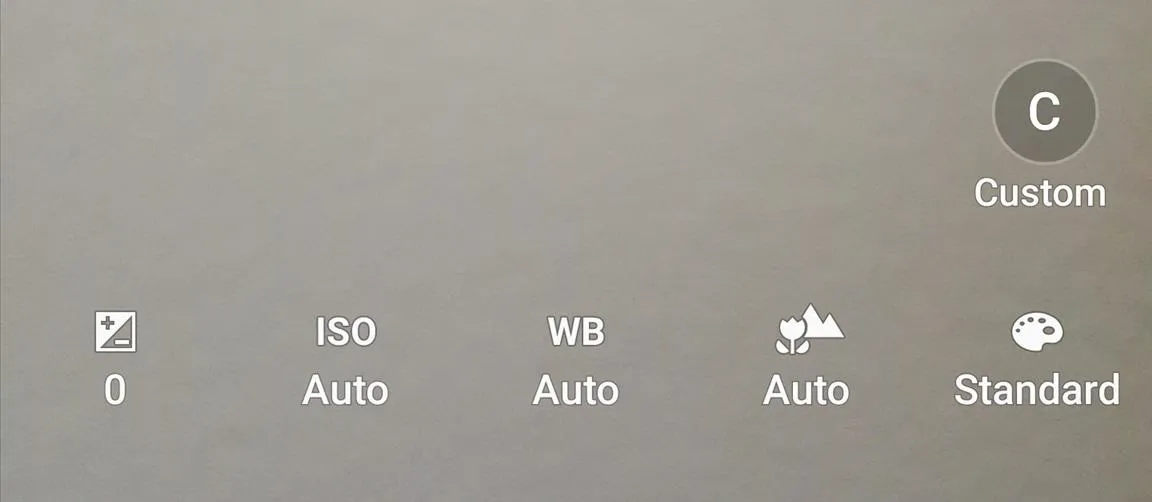
Profiles
If you press the "C" icon, you can save your settings as a preset to be called back later with one simple tap.
The Mode Menu
The Mode menu, where the previously covered Pro features are located, is one of the coolest places to explore in the Galaxy device's camera app.
Selective Focus
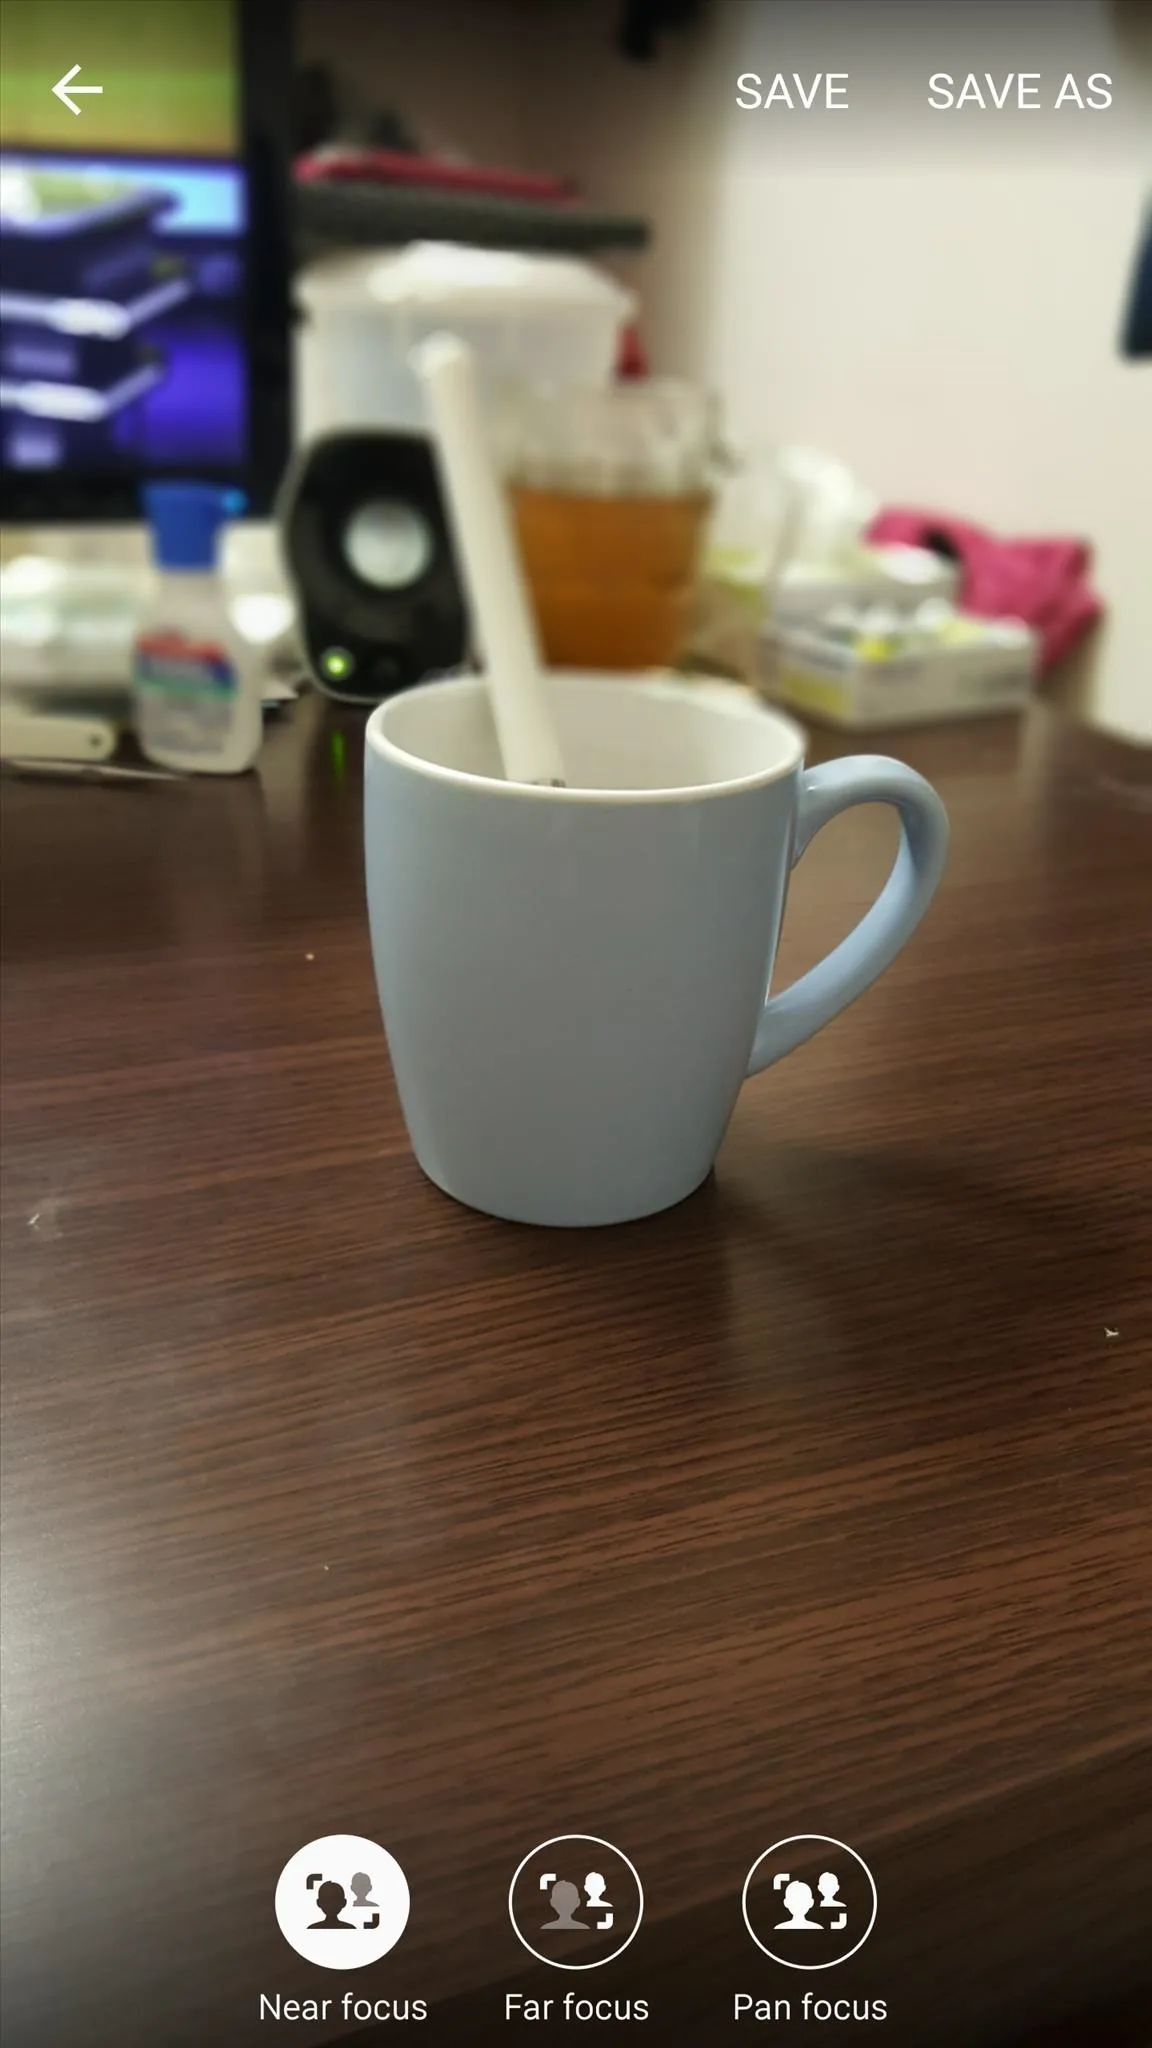
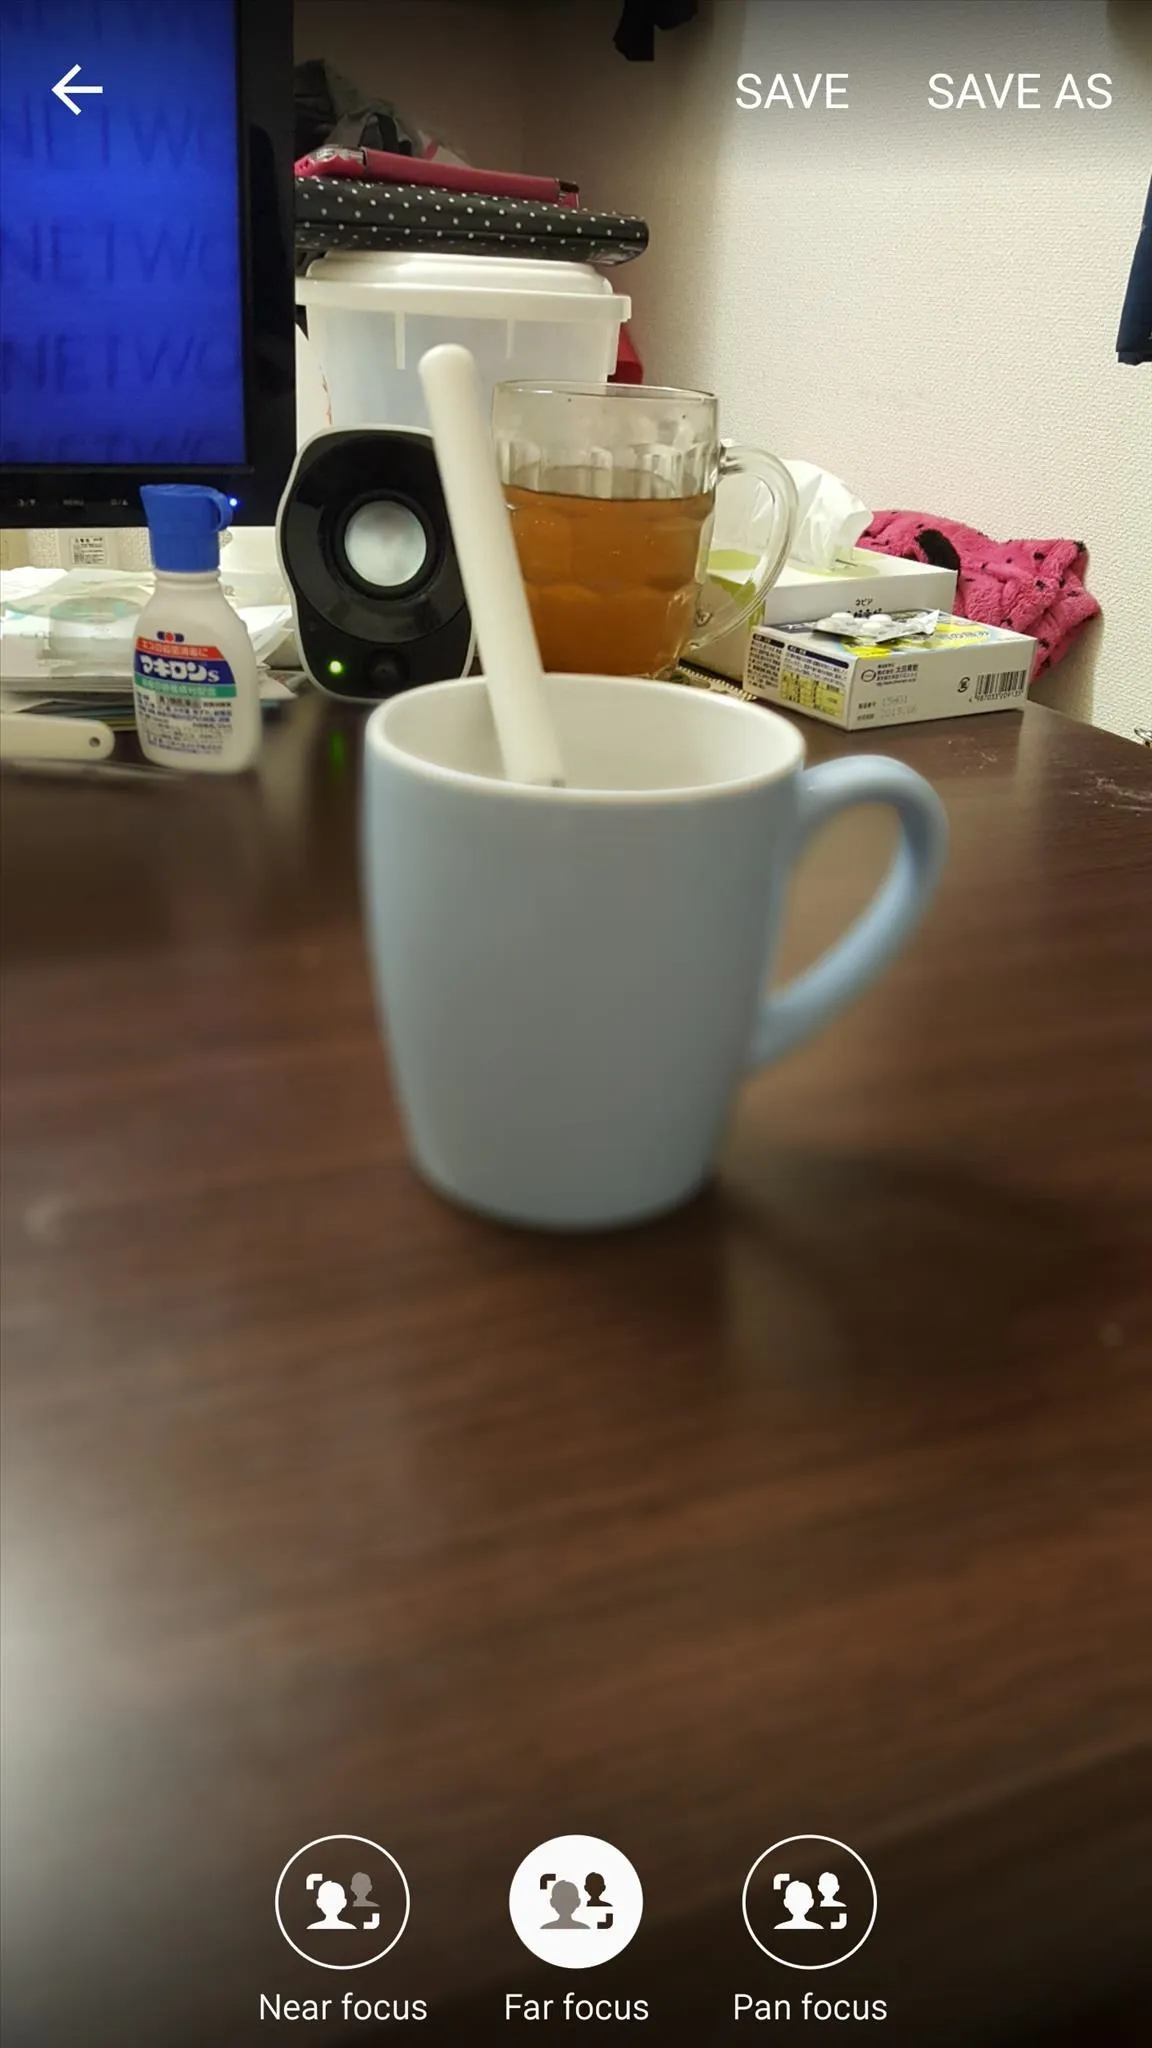
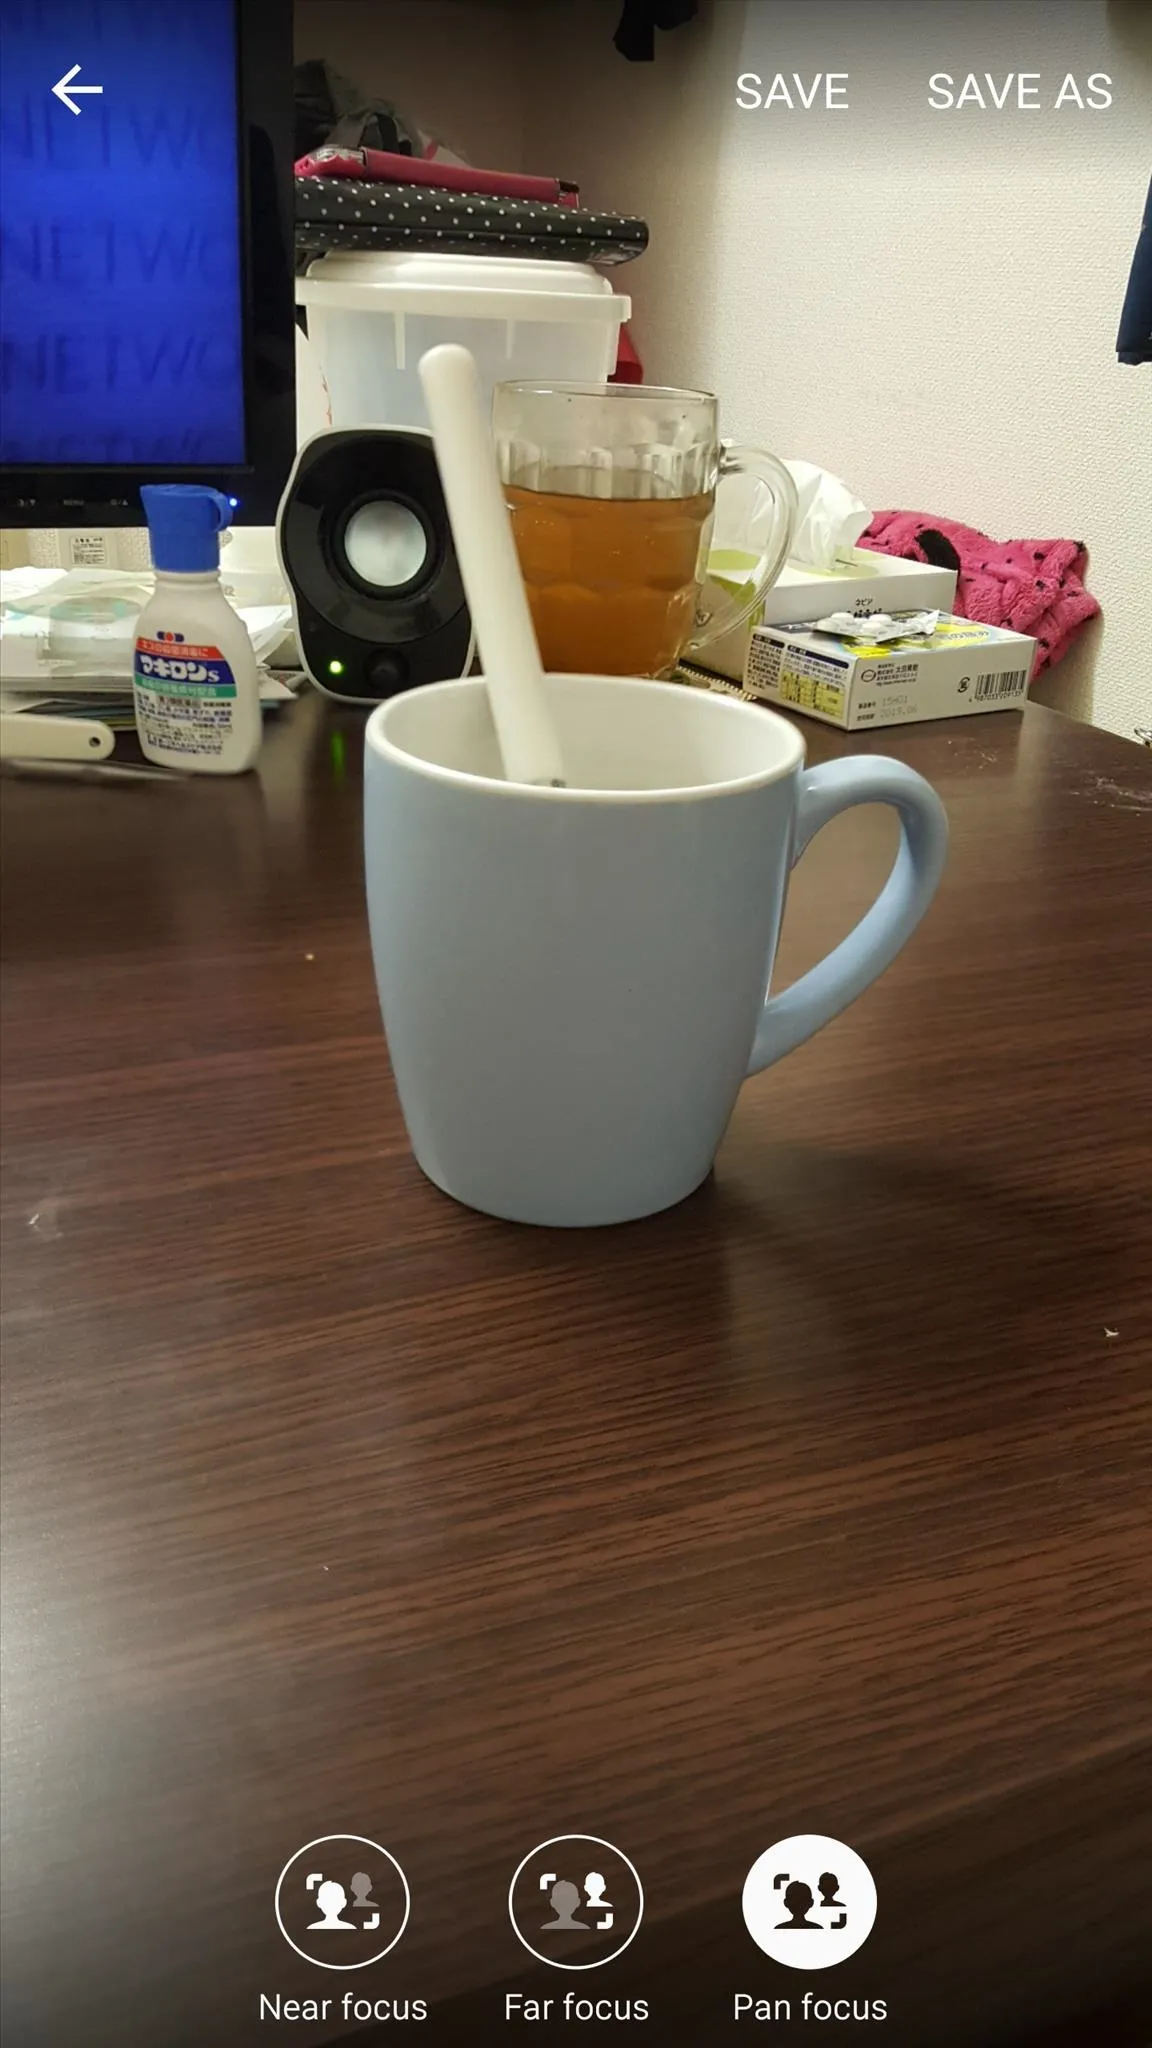
Selective focus is a cool feature that allows you to take a picture in which you can change the focus of the image by tapping an option. It basically takes three pictures with different focus points around a chosen object and puts them together so you can choose your desired focal-object.
Just select the Selective focus option, tap the object you want to focus on, and press the shutter button. That's it. You can check out your photo in your Gallery app.
In the images above, you can see the first image shows the near object in good detail while blurring the background, the second image does the opposite, and the third is a composite that tries to balance it all out.
Panorama
Panorama lets you take a panoramic picture by rotating your device around in a circle.
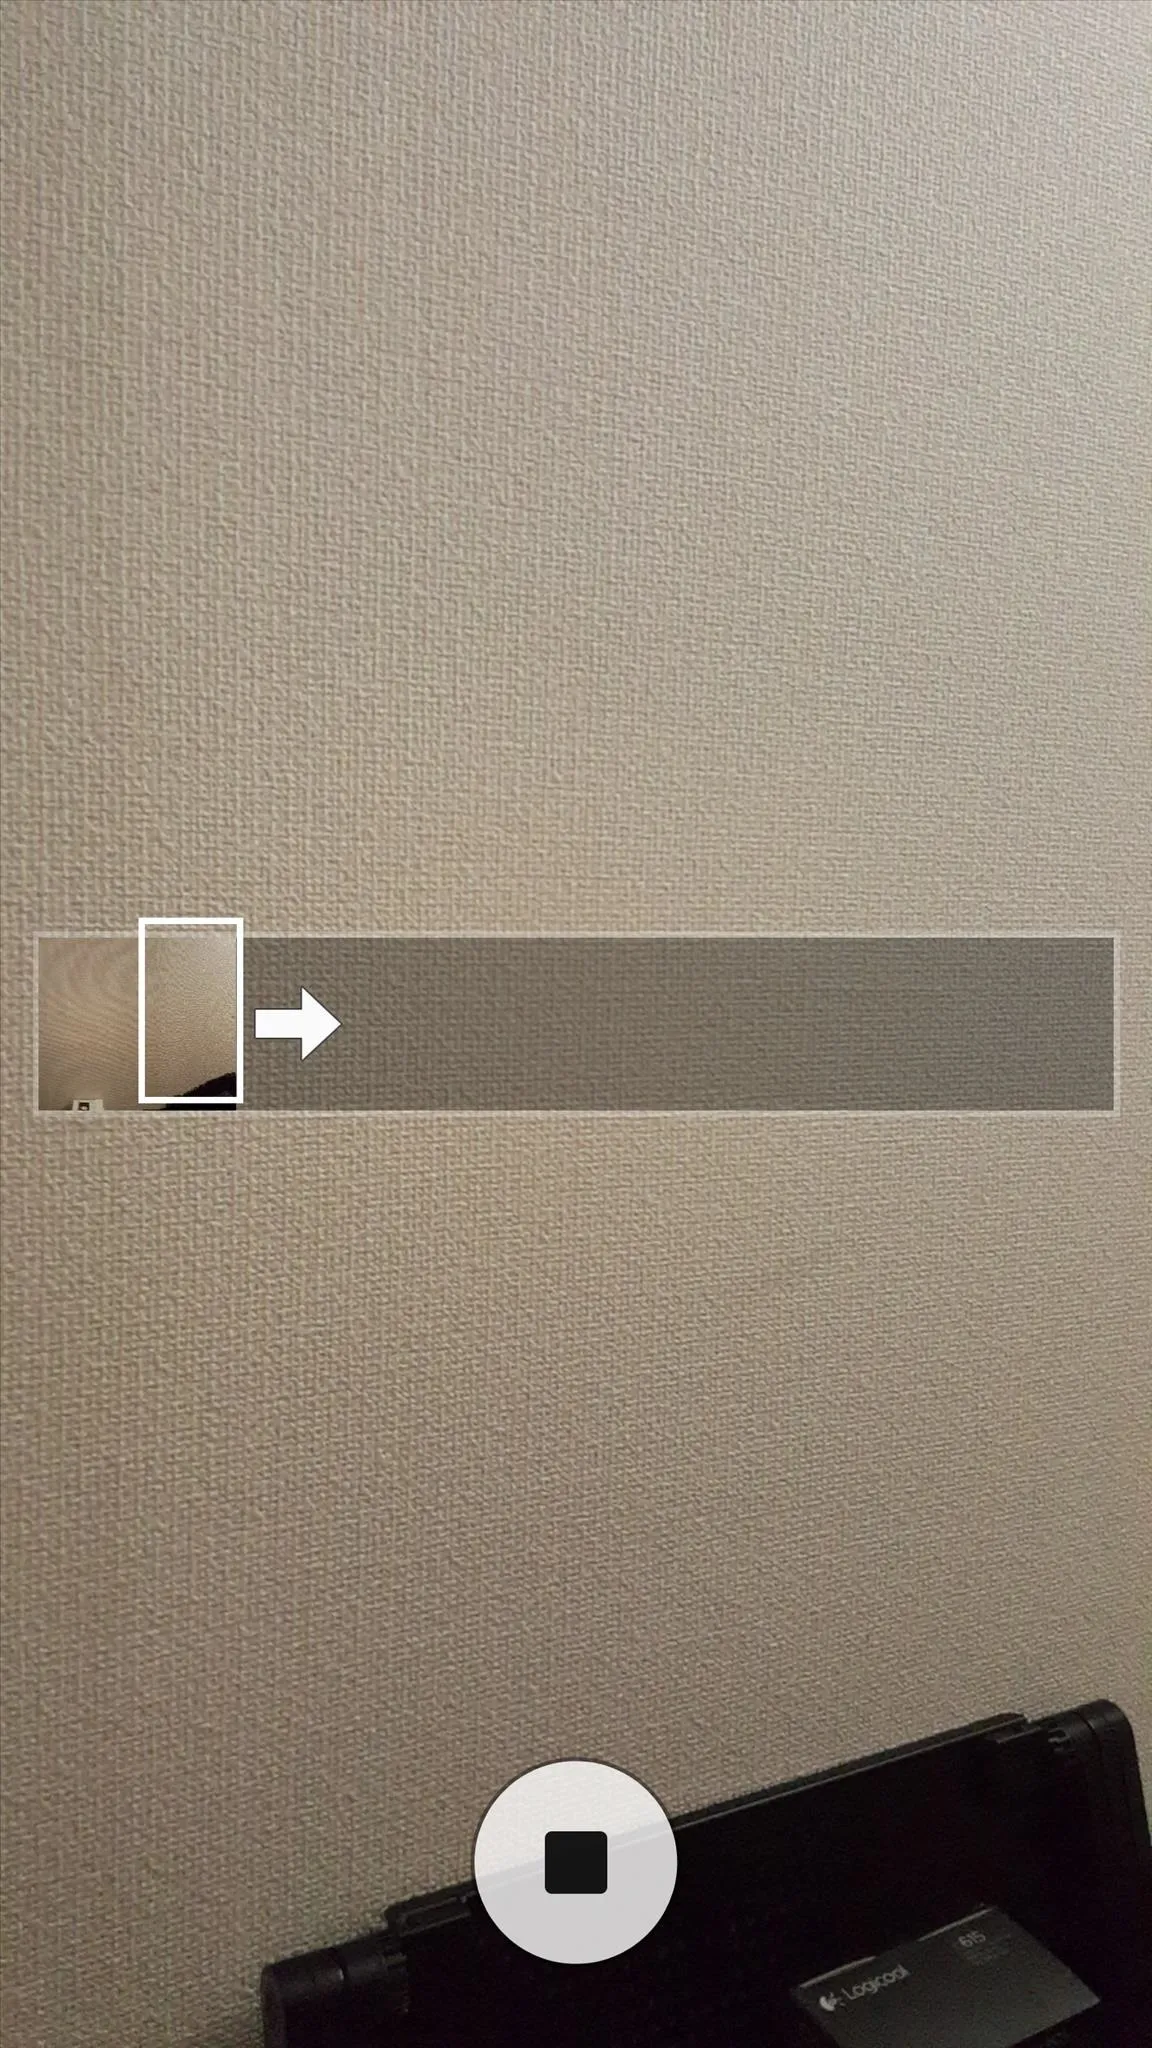
To use it, choose the option, line up your starting shot, and then press the capture button. Rotate around in a circle as slowly as possible, trying to keep the device as level as you can. If you move the device up and down too much, you'll distort the image, and the final result will look like the scene has been cut with a knife.
Move around until the gauge in the middle of the screen is full. After taking the shot, you can go to the gallery to see your creation. Tap the button in the middle of the screen to play your panoramic photo. The device will auto-scroll around for you, showing everything you captured, but you can take manual control by touching the photo.
Slow and fast motion
The slow and fast motion options allow you to take slow and fast motion videos automatically.
Just select the desired option and press the red record button. After your video is done recording, the device will automatically slow down or speed up the motion in the video, creating a cool effect.
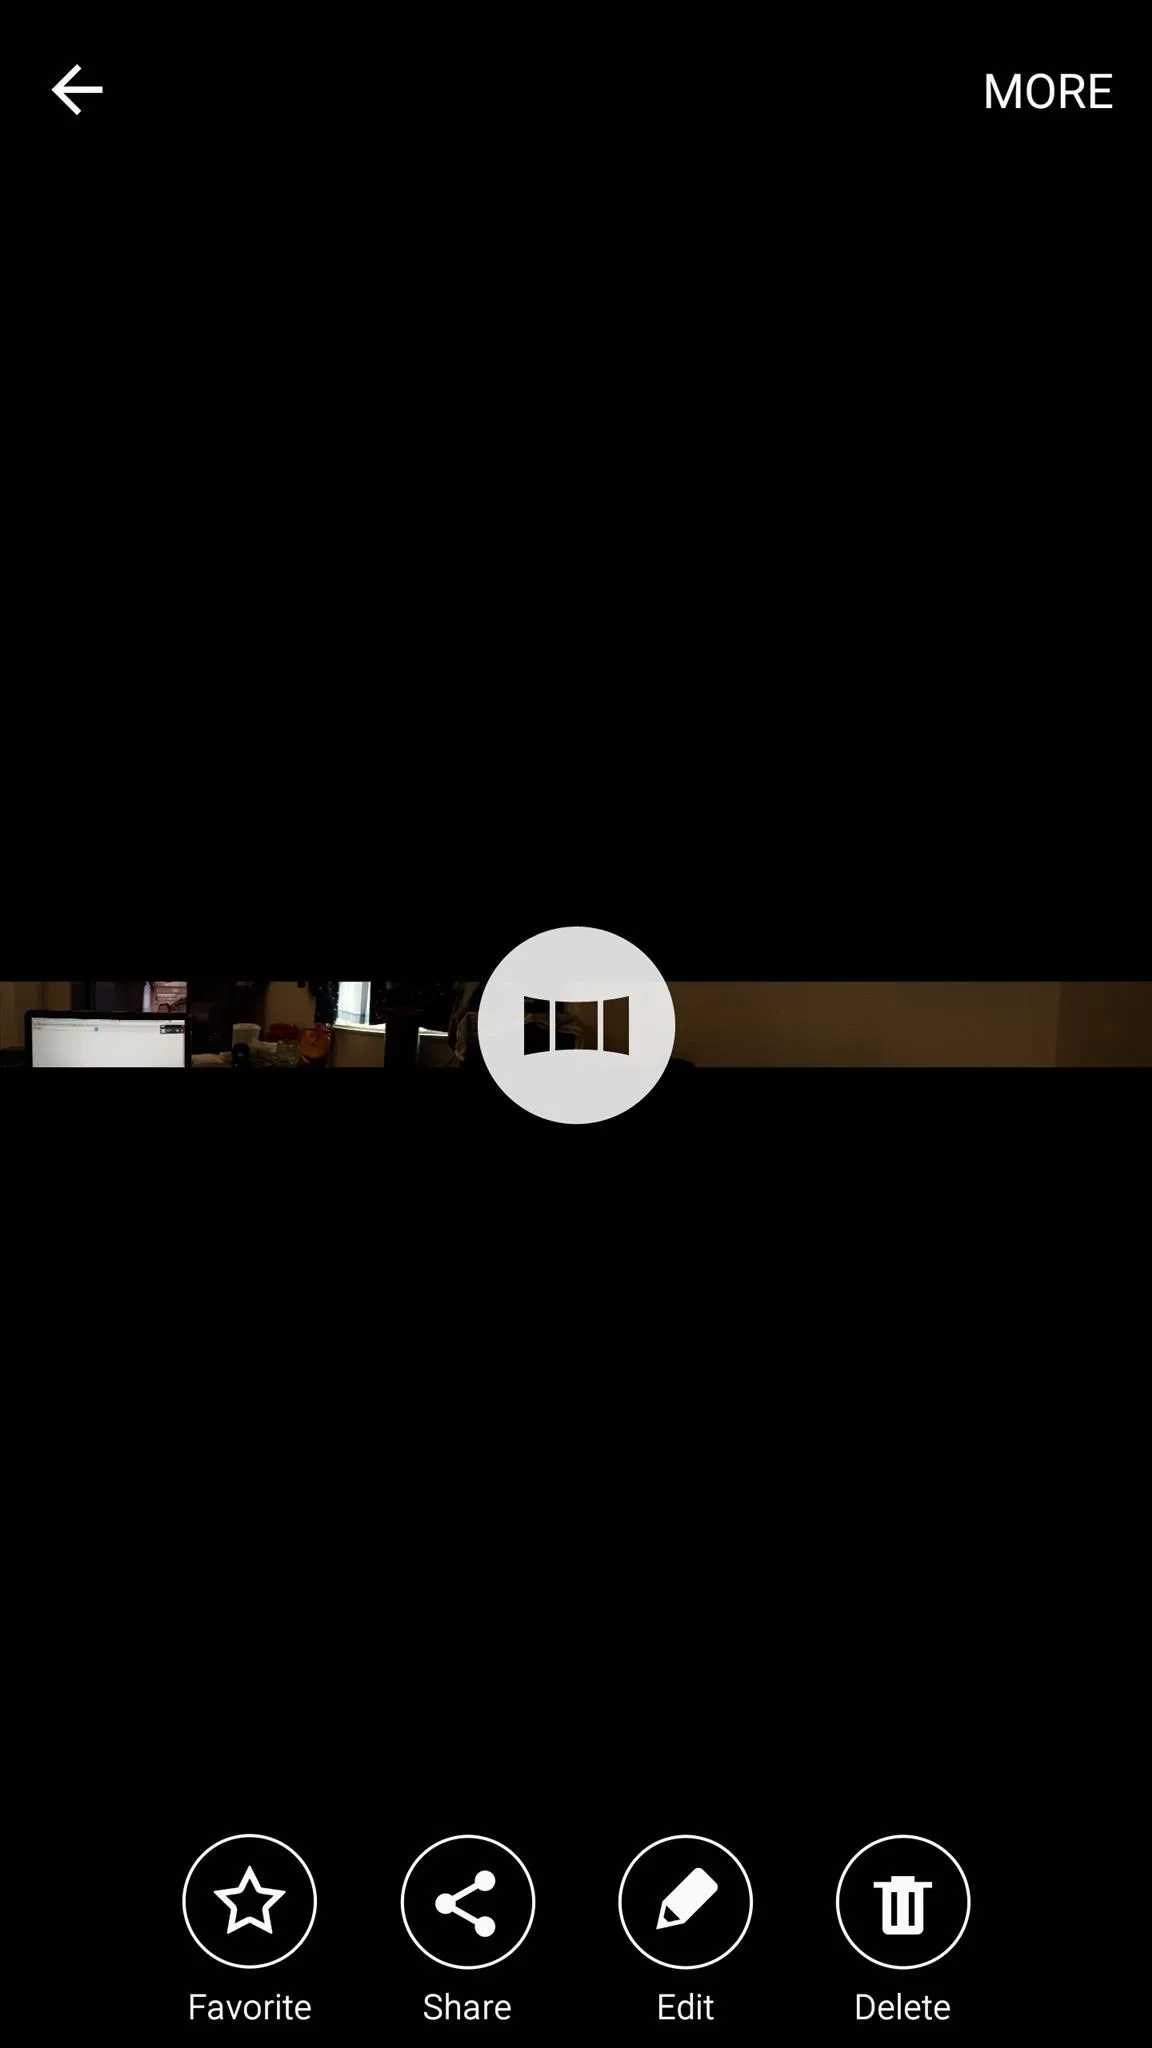
Virtual shot
Virtual shot is a cool gimmick effect that allows you to take an interactive photo of an object that you can manipulate.
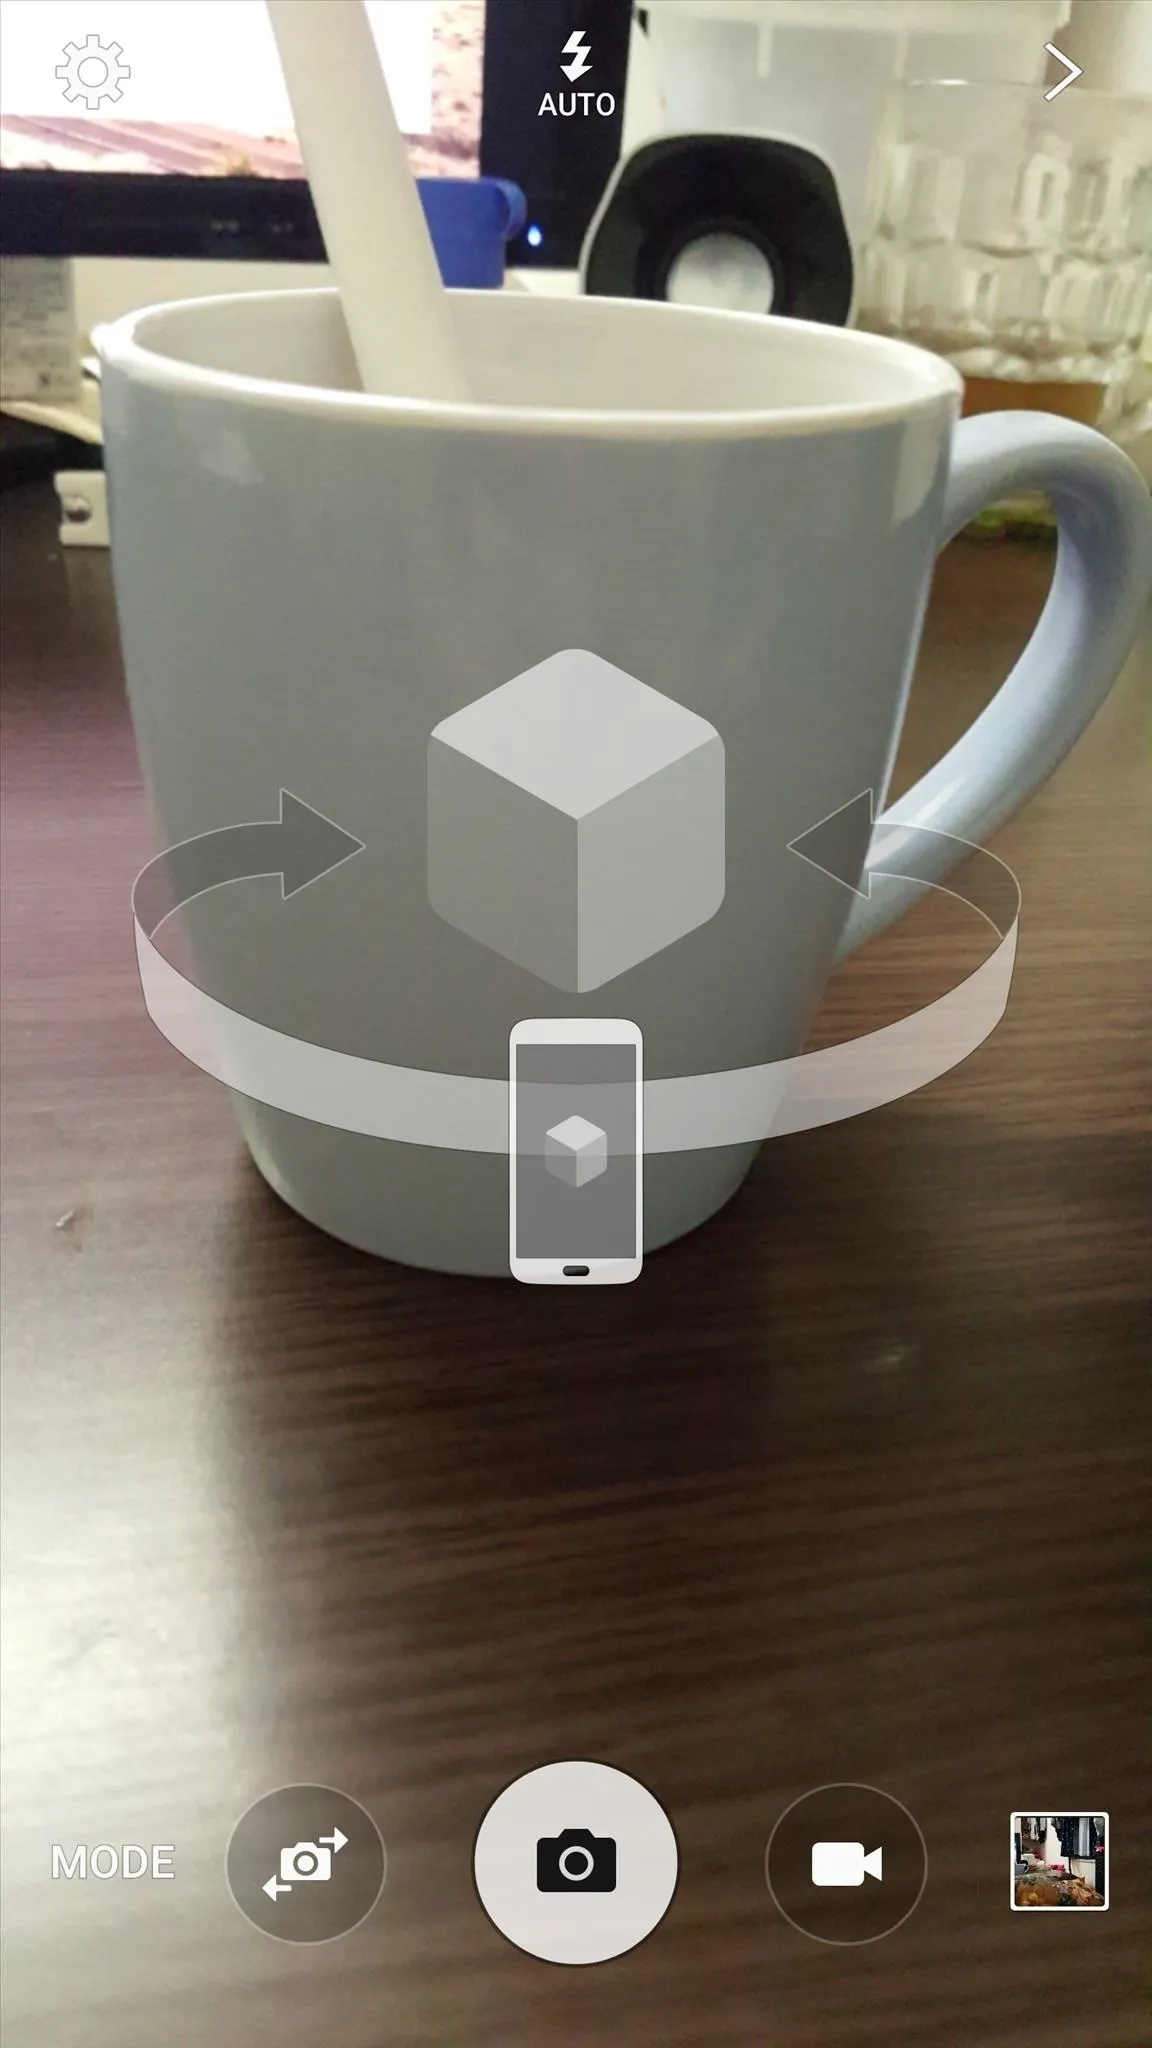
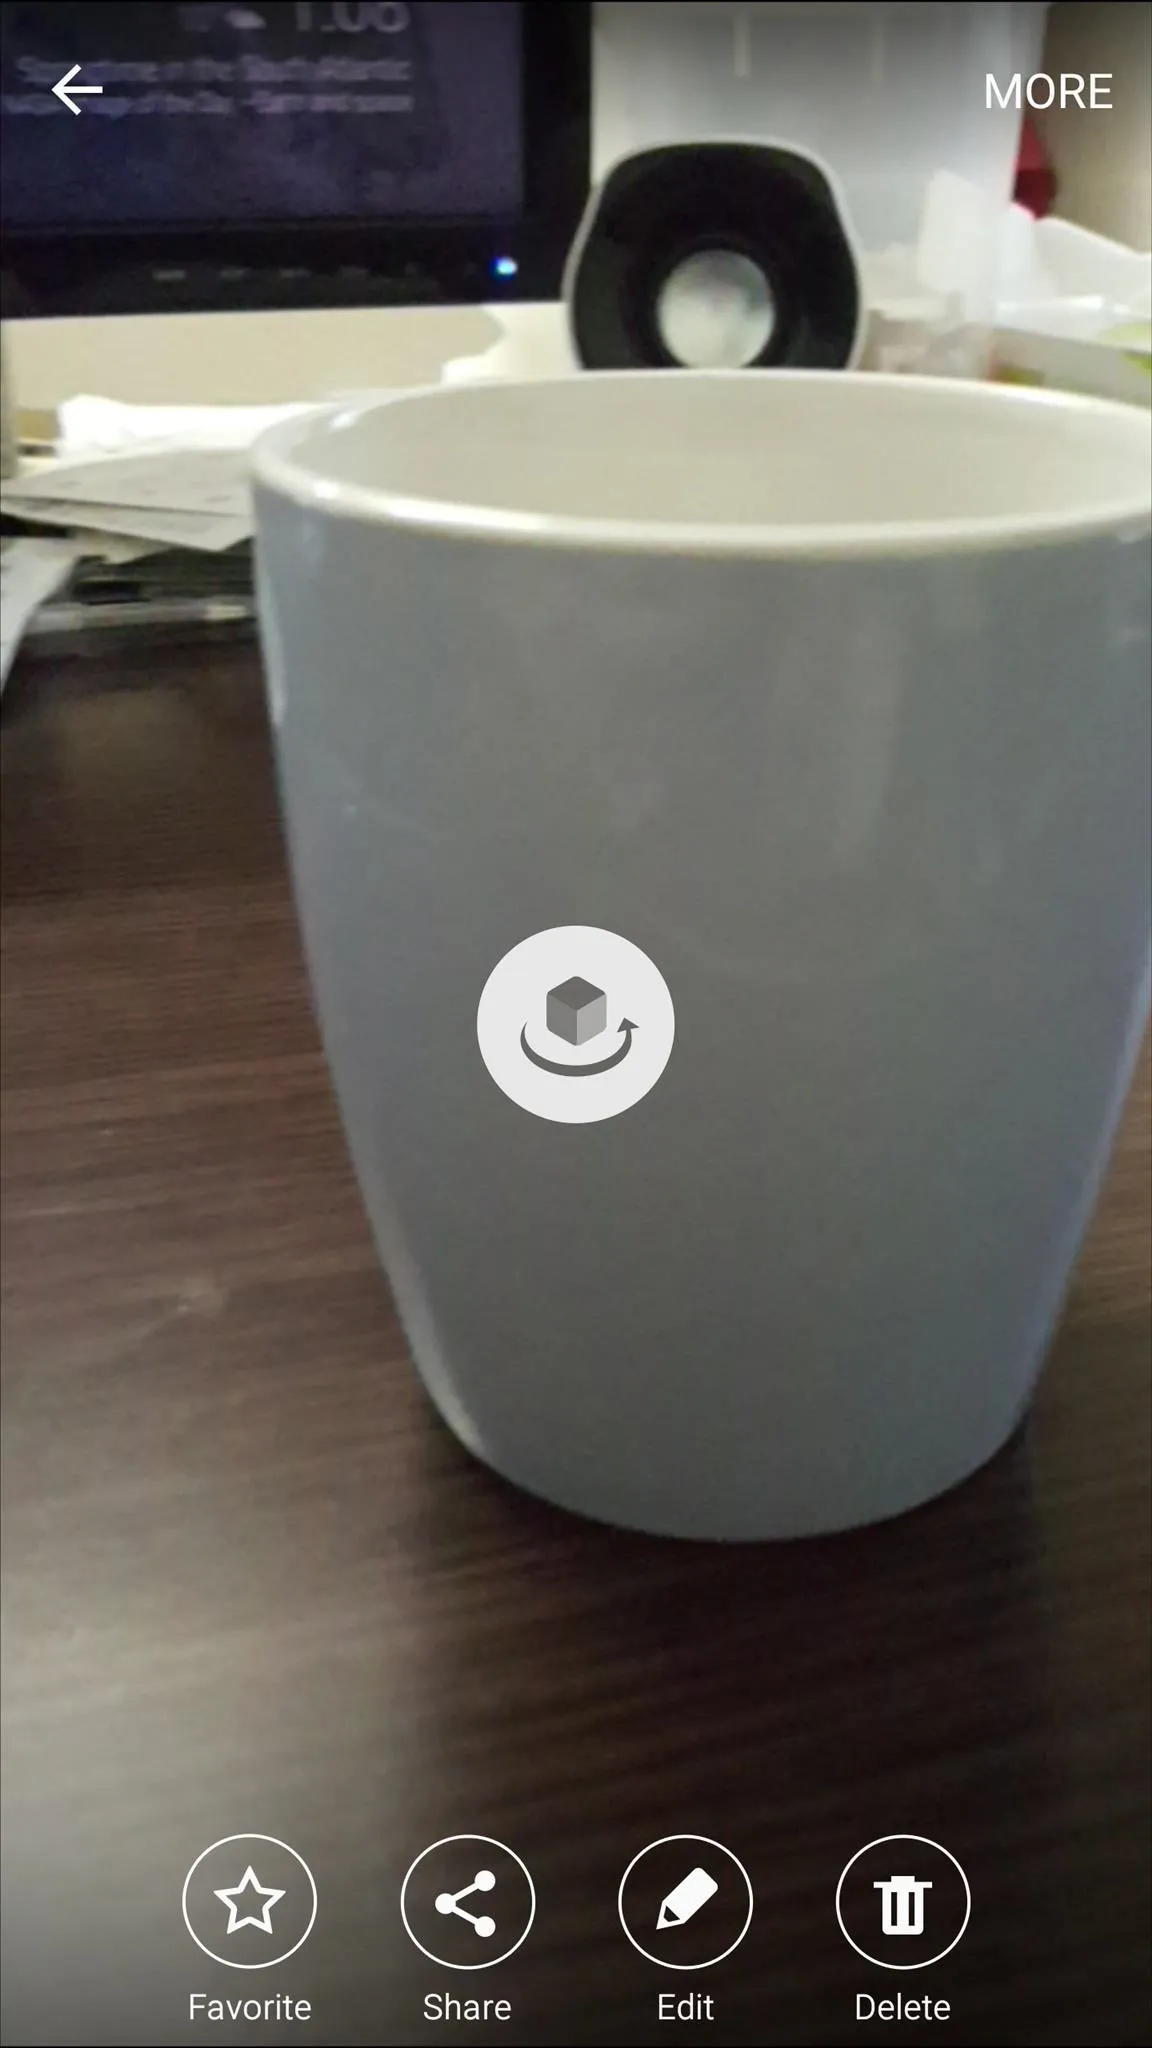
Just line up the shot near the desired object, press the capture button, and rotate the device around the object to the left or right. Try to keep the device the same distance from the object and level throughout the process.
Your Galaxy will let you know when you've finished. View the image in your gallery app and swipe left and right on your picture to change the viewpoint of the object as if you are moving around it. It's not perfectly smooth like a video, but it's still pretty cool.
Download
The download option allows you to download many more interesting features that you can add to your camera from the Samsung App Store.
Hopefully you learned some cool stuff to try out the next time you want to take some shots with your Samsung Galaxy device. What worked for you? What more would you like to see from Samsung in terms of features?
Let us know in the comment section below, or drop us a line on Android Hacks' Facebook or Twitter, or on Gadget Hacks' Facebook, Google+, or Twitter.


Comments
Be the first, drop a comment!