If you own a Samsung phone and enjoy rooting or modding your device, flashing official firmware can be very useful. Odin is Samsung's own internal program for loading such updates for testing purposes, and it's quite easy to use for your own custom modification needs.
Though Odin is fairly simple, there are a few requirements and basics you'll need to learn first. While you can use some hacking to get Odin on a Mac, the native program works only with Windows. We will focus on instructions for use on a PC in this article.
Requirements
- Windows PC
- USB data cable
Find Odin Firmware Files
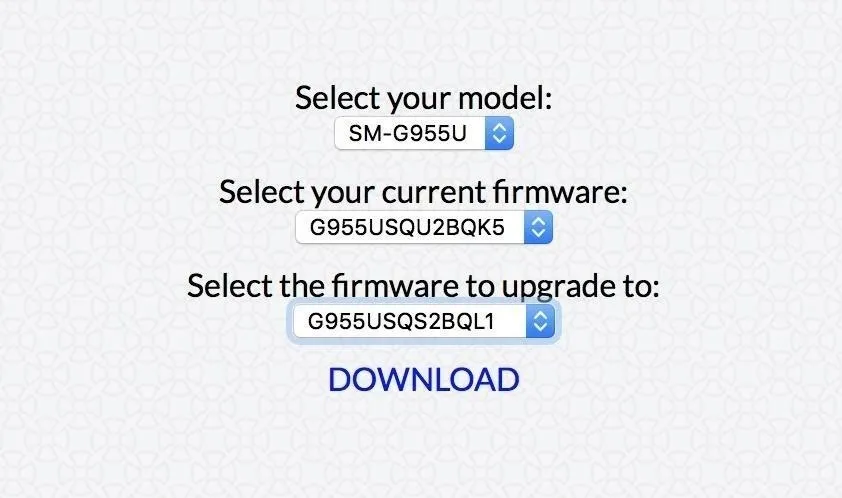
If you're looking for the actual firmware you need to flash, it can sometimes be difficult to locate online. For any older Samsung device, the best place to look is typically in the corresponding XDA forum. Many users post stock and beta firmware in these forums. If you are lucky enough to have a recent Samsung flagship, you can download the desired firmware from the Samsung Firmware Science website.
Extract the Firmware Files
Next, right-click on the Odin firmware ZIP file and choose "Extract all." Inside the extracted archive, you will see five MD5 files (pictured below). Take note of the location for these files, as you'll need to select them later.

Install the Right Drivers
Your PC needs the necessary drivers to interface with your Samsung phone. Samsung maintains an official webpage where you can grab the drivers you need. Download the drivers and run the setup to install them on your PC, then reboot your computer to make sure they've been applied. Don't skip this step, as it could cause issues with operating the Odin executable file.
Install Odin on Your PC
The Odin software only works with Windows, so make sure to have a PC handy. First, download the latest version of Odin. Extract the ZIP file for the latest version and run the EXE file inside of it to launch Odin.
Put Your Phone in Download Mode & Connect to PC
With the device turned off, press Power + Volume Down + Home to enter Download Mode. Some older devices use a different button combination. To find the exact key combination for your device, just do a simple Google search — for instance "Galaxy S3 download mode." At this point you can connect the phone to your PC using the USB data cable.
Newer Galaxy phones without a home button will require a different button combo to enter Download Mode (Volume Down + Bixby + Power). You can read more about the quirks of entering Download Mode on these devices here.
Flash the Firmware Files
Head back to the Odin application. Click on the 'BL' button, then choose the file that starts with "BL" inside your extracted firmware folder. Next, click on the 'AP' button in Odin and choose the AP file inside your extracted firmware folder. Click on the 'CP' button, choose the CP file inside your extracted firmware folder. Click on the 'CSC' button, choose the HOME_CSC file inside your extracted firmware folder.
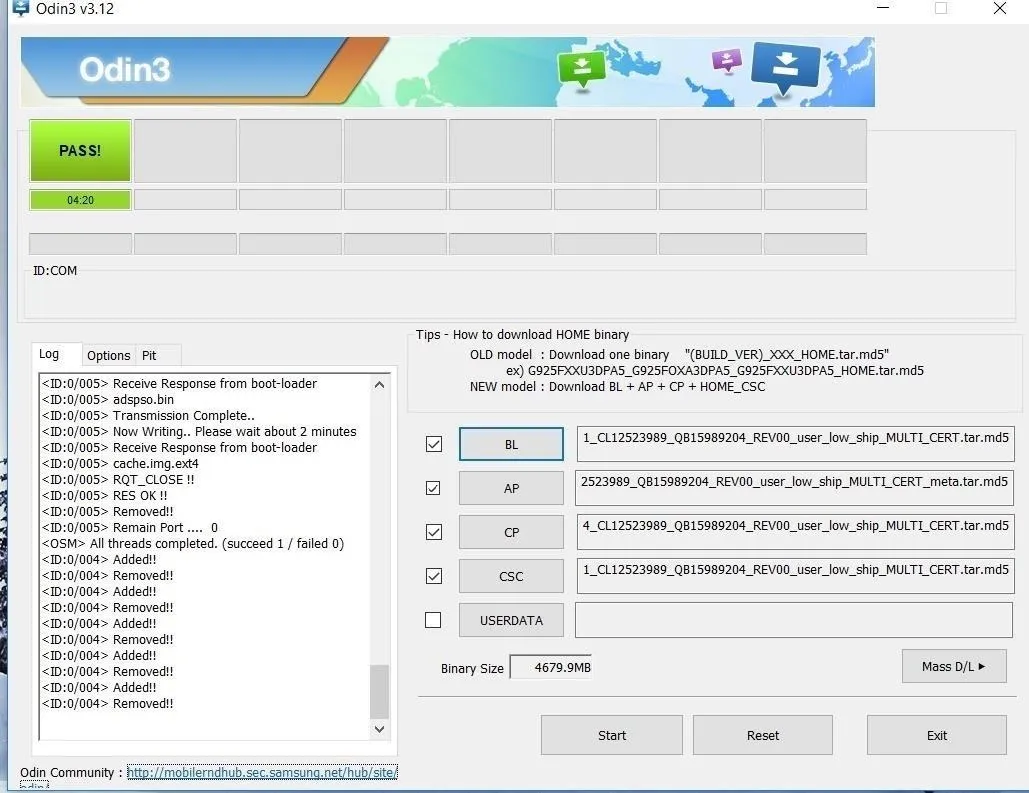
Make sure you choose the HOME_CSC, and not CSC file. The USERDATA button is not necessary or needed for this process. Verify that all four files are loaded and that check marks appear next to each button. Click on the "Start" button at the bottom of the Odin application when you're ready.
The flashing process will begin and should take about 10–12 minutes. It may take some time for your device to reboot, but don't be alarmed. When your device finally boots up, you should now be running your desired firmware. If you want to check that the correct firmware is installed, head to Settings –> About Phone –> Software Information. The firmware number is located under "Baseband version."
Keep in mind that if you update to a beta or testing build, you may not be able to go back to the old firmware. If the bootloader is advanced on the new build, Odin may not work to downgrade to your previous software. Even in the likely case that you can downgrade to your old firmware, you will always need Odin to go back to a older build. Do not attempt sideloading methods to revert back.
Using a new hacking tool can be intimidating the first time, but Odin isn't so bad if you follow these easy steps. Let us know in the comments if you have used Odin successfully yourself, or if you have any additional questions on the process!
- Follow Gadget Hacks on Facebook, Twitter, YouTube, and Flipboard
- Follow WonderHowTo on Facebook, Twitter, Pinterest, and Flipboard
Cover image and screenshots by Jeff Springer/Gadget Hacks









Comments
Be the first, drop a comment!