
If you installed Android 9.0 Pie, you might have enjoyed trying out some of the new features in the latest version of Google's OS. However, change isn't always a good thing, so you might be wishing you could downgrade back to Oreo right about now. Good news — you can.
Unfortunately, returning to Oreo isn't as simple as you might think. While you don't have to worry about rollback protection preventing you from installing the older version (at least for now), downgrading from Android Pie does require a bit of work. If you want to bring your Pixel back to Oreo, you're going to have to flash the OS images onto your phone with Fastboot.
Step 1: Install ADB & Fastboot on Your Computer
To begin, make sure to install ADB and Fastboot onto your computer. These two utilities allow you to flash images via Fastboot commands. You can find various third-party "one-click" and "light" forms of ADB and Fastboot, however, they aren't updated as often as the official versions, so you might not find them to be completely compatible with the latest version. For that reason, we don't recommend them.
What you should do is install the Android SDK Tools, which features ADB and Fastboot, or simply download ADB and Fastboot directly from Google. Either way, have peace of mind that you're getting the complete package here. Make sure to check out Method 1 in the guide below for Windows, Mac, and Linux installation instructions.
Step 2: Enable OEM Unlocking (OTA Method Only)
Flashing images in Fastboot requires you to unlock your device's bootloader. For those who flashed Android Pie manually, your bootloader is already unlocked as part of Step 1, so you can skip this step. However, if you got Android Pie as an OTA update, you will most likely need to unlock the bootloader to flash Oreo now.
However, before your bootloader can be unlocked, you'll need to enable a setting first. To find and enable this setting, turn on the Developer Options menu on your Pixel. Then, open the Developer Options menu and tap the switch to the right of "OEM unlocking."
Step 3: Enter Bootloader Mode
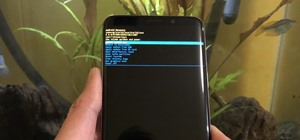
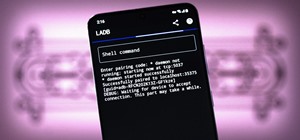
Before you can run any Fastboot commands, your device must be in bootloader mode. To begin, completely power down your device. Once the screen goes black, press and hold both the volume down and power buttons together for roughly 10 seconds. You should then see Android's bootloader menu, which looks like this:
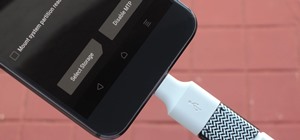
Once you see the bootloader menu, plug your device into your computer via a USB data cable. You can put your device down after that, since the rest of this process with be done completely on the computer.
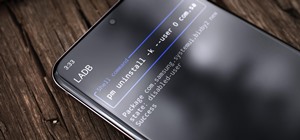
Step 4: Open a Command Window on Your Computer
Head over to the ADB and Fastboot installation directory on your computer. On Windows, you can usually find this at C:\Program Files (x86)\Android\android-sdk\platform-tools. On Mac and Linux, it will depend on where you put the ADB folder when the utility was installed. If you forgot where that was, search your computer's hard drive for the platform-tools folder.
If on Windows, hold down the shift key, then right-click anywhere there's empty space in the platform-tools folder. Select "Open command window here." On Mac or Linux, open a new window in Terminal, then change directories to the platform-tools folder inside your ADB installation directory using the "cd <folder location>" command.
Step 5: Unlock the Bootloader (OTA Method Only)
The next step only needs to be done once. If your bootloader is already unlocked, feel free to skip to Step 6. If not, you have to run a single Fastboot command. Note: this action will delete all data on your device.
This next part lists the Windows commands needed to unlock the bootloader. If on Mac, you'll likely need to add a period and a slash (./) before each command, while Linux users just need to add a slash (/) in front.
When you're ready, type the following command from the ADB shell, then press enter.
- fastboot devices
If you see a series of numbers and letters followed by "fastboot," then you know your device is properly connected. If not, go back to Step 1 to double-check your ADB and Fastboot installation. Make sure your device is in bootloader mode as you see in Step 3.
Now, you're finally ready to unlock the bootloader. Just type the following command, then press enter:
- fastboot flashing unlock
Here, you should be greeted by a message on your Pixel asking if you're sure you'd like to unlock the bootloader. You'll want to be sure the "Yes" option is highlighted. If not, use your volume keys to select it. Once highlighted, press the power button. Your bootloader will unlock, and your device will reboot back to Fastboot mode.
Step 6: Download the Factory Images
Now that you've unlocked the bootloader, you can start flashing the Oreo factory images. Before you can do that, however, you'll need to download the images themselves. You can snag the Oreo factory images from the page below:
To use that page, find your specific Pixel model in the list on the right of the page, then click it. From there, click the link next to the most recent version that starts with 8.x.x.
Step 7: Flash the Factory Images
Now, the first thing you should do here is extract the factory images archive that you downloaded from your manufacturer's site. For that, we recommend you use 7-Zip — not only is it free, it's also compatible with most archive formats.
Next, take the contents of the archive and move it all to the platform-tools folder in your ADB installation direction, the open an ADB Shell window here. If you need more context here, check out Step 4 above.
Other than that, there are two separate approaches you can choose when flashing these images:
Option 1: Use the Flash-All Script
Arguably the easiest way to re-flash Oreo is to use is with the "flash-all" script. This script applies all of the images in one action. On the flip side, the script might drop the ball on certain operating systems and setups, but since it won't harm anything if it does, you might as well give it a go. To run this script, type the following into the command prompt, then press enter:
- flash-all
This can take a few minutes to complete, but once it does, your device should reboot automatically, running stock firmware.
Option 2: Extract the Images & Flash Them Individually
If the flash-all script didn't work, you can flash the system images one by one. This method takes some extra time, but it will get your phone back to Oreo.
To begin, extract any additional archives from the factory images package. Occasionally, factory images packages contain a series of three or four nested archives, so be sure to unzip them all. Next, copy all of the image files to the main platform-tools folder — basically, don't leave them in any of the sub-folders.
Now, there are six images that you'll need to focus on: boot, bootloader, radio, recovery, system, and vendor. These are the files that make up the core of Android.
Some of these files may have longer names than just, for example, bootloader.img. If so, be sure to enter the full file name (rather than the placeholder text in brackets) when sending the image-flashing commands below.
First, you have to flash the bootloader image — this is the interface that you're using to flash images with Fastboot commands. So to downgrade your bootloader to the Oreo version, type:
- fastboot flash bootloader <bootloader image file name>.img
Next, reload the bootloader to keep flashing images on the Oreo version. For that, type:
- fastboot reboot-bootloader
Next up, there's the boot image, which contains the kernel. To flash it, type the following into the ADB shell window:
- fastboot flash boot <boot image file name>.img
After that command, there's the radio image. Type this to flash it:
- fastboot flash radio <radio image file name>.img
Then we have recovery. Type:
- fastboot flash recovery <recovery file name>.img
The big one is next: the system image. This one contains all of the files that make up Android OS. Type:
- fastboot flash system <system file name>.img
And, finally, there's the vendor image. This is an important part of the new Project Treble system, so it's really a key image. Type:
- fastboot flash vendor <vendor file name>.img
Once you've sent any or all of these commands, you can restart your device, then boot into Android. For that, type:
- fastboot reboot
Your device should now be fully downgraded back to Oreo. And now that you know what each of the core system images actually does in the OS, you'll have a better idea of how Android works now. Win-win!
Who needs a wand? Unlock your magical powers and transform yourself from a Muggle into a Wizard or Witch just by using your Android phone. See how:


1 Comment
So, on ,at least, android 8-9 there is no recovery.img file in the zip. and there are many more .img files to upload to your phone than you listed in your article. So any of us that for whatever reason are unable to use the flash-all.img command will be left out in the cold, with these instructions. these are the .img files inside the sailfish-opr3.170623.008.zip images sub-folder: aboot.img
android-info.txt
apdp.img
boot.img
bootlocker.img
cmnlib32.img
cmnlib64.img
devcfg.img
hosd.img
hyp.img
keymaster.img
modem.img
pmic.img
rpm.img
system.img
system_other.img
tz.img
vendor.img
xbl.img
From everything i have been able to find what used to be the recovery image is in one of these files (though noone seems to know which) or perhaps parsed out among several. The main reason I am taking the time to leave this comment is because you made this article in Oct 2018 which means this information should have been available to you at the time of writing. So I am wondering if you just hadn't tried this in awhile and assumed nothing had changed, or if you had just found someone else's article and re-posted their content, without any real experience with this process. I in no way am intending to be rude, its just really hard to find information on this process that is currently relevant and anyone trying to find answers will more than likely run across this article. So, it would be amazing if it could be updated to show in which order to install the images that are currently in the builds. That information could've just saved me the money i paid to have someone else put android back on my phone after i accidentally wiped the /system folder (total newb move) :'(
Share Your Thoughts