
There were some new hurdles to clear, and then there were a few more, but legendary root developer Chainfire has created a fully-functional root method for Google's Pixel and Pixel XL flagships. Like past devices, this method relies on the SuperSU ZIP, but now, there's an additional file that needs to be flashed in order to bypass issues with Android Verified Boot (AVB).
You'll have to unlock your bootloader to get this one going, so that rules out Verizon-branded Pixel devices. However, Pixels purchased from the Google Store or any other retailer can be rooted. So if you want to get the most out of your Pixel or Pixel XL, we'll cover all of the steps for rooting, then follow that up with instructions for flashing the boot image patcher to make root stick even with the changes to AVB.
What You'll Need
Before You Begin
Understand that rooting will interfere with your ability to accept OTA updates, and perhaps more importantly, this process will trip SafetyNet on your device. SafetyNet is a security feature in newer Android versions that lets apps know when the user is rooted, among other things. Ultimately, this means that apps like Android Pay and Pokémon GO will likely fail to run after rooting.
Finally, Step 2 below involves unlocking your device's bootloader. If you haven't already done this, you should be aware that the process of unlocking your bootloader will trigger a factory reset. So before you begin, make sure to back up all important data.
Step 1: Install ADB & Fastboot on Your Computer
To begin, you'll need to install ADB and Fastboot on your computer so that you can flash TWRP custom recovery on your device. Honestly, this might be the hardest part of the whole procedure, so we've covered it with a separate guide — but don't let that scare you off, because it's really just a matter of installing one program. For best results, I'd recommend using Method 1 at the following link.
Step 2: Unlock Your Bootloader
Next up, you'll need to unlock your device's bootloader if you haven't done so already. This is the part that will wipe your device, so make sure you have any important data backed up before you proceed. Aside from that, just follow the steps at the link below, then boot back into Android and run through initial setup when you're done.
Step 3: Install TWRP
The actual rooting part of this procedure will take place inside of TWRP recovery. TWRP is an essential tool for rooted users, as it allows you to flash ZIPs and create NANDroid backups. Installing TWRP is relatively simple and only involves sending one Fastboot command, then tapping a few buttons in TWRP. For a full guide on this aspect, make sure to visit the following link.
Step 4: Download the SuperSU & Boot Image Patcher ZIPs
Next up, you'll need to download a pair of files and save them both to your phone. The first file is Chainfire's SuperSU ZIP, which is what actually roots your device. The second file is a boot image patcher (also provided by Chainfire), which is now required as a result of recent changes to Android's Verified Boot system. Both ZIPs are compatible with all models of the Pixel and Pixel XL, so tap the following download links to grab them.
Step 5: Boot into TWRP
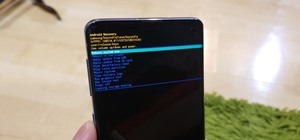
Next, you'll need to boot into TWRP to flash the two ZIPs you just downloaded. So power your Pixel completely off. When the screen goes black, press and hold the volume down and power buttons simultaneously. Within a few seconds, you should be greeted by Android's Bootloader menu, which looks like this:
From there, press the volume down button twice to highlight the "Recovery Mode" option, then press the power button to select it. After about 10 seconds, TWRP will pop up and ask you to enter a password, so type in the password or PIN you use to secure your lock screen, then wait about 10 more seconds while TWRP finishes loading.
Step 6: Root Your Device
Next, from TWRP's main menu, tap the "Install" button, then navigate to your device's Download folder. From here, select the SR3-SuperSU.zip file, then swipe the slider at the bottom of the screen. When that process is finished, tap the back button, then select the VerifiedBootSigner.zip file. Again, swipe the slider to install the ZIP, but when it's finished this time, go ahead and tap "Reboot System."
From here, your phone will reboot a couple times, but that's normal. In fact, it can take as long as 10 minutes for the phone to finish booting after installing SuperSU, so sit back and wait patiently.
Step 7: Verify Root
When you get back up, your device should be fully rooted. To verify this, download an app called Root Checker from developer joeykrim. From there, simply run the app, then tap "Verify root" and press "Grant" on the Superuser access request. If everything went off without a hitch, you should see a message saying "Congratulations! Root access is properly installed on this device!"
At this point, your device should be rooted, and you'll be all set to have some fun with some of the best mods Android has to offer. If you're looking for a place to start, we suggest the following article. which covers some of the best root apps for Android.
Who needs a wand? Unlock your magical powers and transform yourself from a Muggle into a Wizard or Witch just by using your Android phone. See how:


1 Comment
Thank you!!!
Share Your Thoughts